Introduction
Overview
Teaching: 10 min
Exercises: 0 minQuestions
Key question (FIXME)
Objectives
Review important points from the lesson “Version Control with Git”.
Recap: Important Git Commands
git config- configure personalized settings for Git.git init- initializes a new Git-repository.git status- shows the status of the repository.git add- adds a file to the staging area.git commit- store staged changes as a new change-set (commit).git diff- show differences between versions. By default the difference between working directory and staging area.git log- shows list of versions (commits).git checkout- recover old versions of files and switch branches.git remote- adds or changes the location of the remote report.git push- copy commits from local repository to remote repository.git pull- copy commits from remote repository to local repository (fetch) and integrate (merge) them into working directory.git clone- creates a local copy of a remote repository.
Recap: the Git working Cycle
Working locally
Typical workday with remote repository
Key Points
First key point. Brief Answer to questions. (FIXME)
Overview of Git hosting sites
Overview
Teaching: 15 min
Exercises: 0 minQuestions
What are the most-widely used Git hosting sites?
Objectives
Common functionalities of Git Hosting sites.
Differences between Git hosting sites.
- Many common features:
- Usually free for public and private repositories
- Private repositories may have some limitations
- Code Management
- Git repositories
- Browsing history
- Branches
- Web code editor
- Forking
- Pull/Merge requests
- Code review
- Issue Tracker
- Milestones
- Wiki (documentation / notes)
- Rendering of Markdown files.
- Group-accounts
- Organizations (GH), Groups (GL), Teams/Projects (BB)
- Snippets (GitHub: Gist)
- Continuous Integration (CI, Pipelines)
- limited number of CI-minutes per month for free
Hosted Platforms
Note that the providers below are constantly adding new features and the list below is just a snapshot of notable features at the time of writing and does not claim to be complete in any way but should just serve as a limited overview.
GitHub
- Biggest site
- Unlimited public/private repositories
- Hosting of static websites using GitHub pages
- Continuous Integration (GitHub Actions):
- free CI-minutes for public repositories and self-hosted runners
- limited free monthly CI-minutes for private repositories
- Package registry (GitHub Packages)
- host packages for npm, RubyGems, Maven, Gradle, NuGet, Container
- free for public packages
- certain amount of free storage and data transfer for private packages
- GitHub sends “Dependabot” alerts for vulnerable dependencies
- Integrated with many 3rd party services
- Offers for Students, Teachers/Educators, OpenSource Teams, Nonprofits.
GitLab.com
- Unlimited public/private repositories
- Hosting of static websites using GitLab pages
- Continuous Integration (CI/CD pipeline) with limited free monthly CI-minutes
- Package registry
- Host packages for npm, Maven, NuGet, PyPI, Containers
- Support for other types is available as Beta
- Limited repository storage amount per project is free
- Additional CI/CD minutes and package storage can be purchased
Bitbucket
- Unlimited public/private repositories (max 5 collaborators)
- Academic accounts (User and/or Team) with unlimited private repositories.
- Continuous Integration (CI/CD pipeline) limited free monthly CI-minutes
Others
- SourceForge.net
- Google Code (closed)
Self-Hosted
- Run a Git Hosting Platform on your own server.
GitLab Community Edition (CE)
- Open Source version of the software running on GitLab.com
- Almost all features of GitLab.com
Gitea
- Very lightweight but just the basic features
Others
Key Points
Several services exist that offer hosting of Git repositories.
Hosting of public and/or Open-Source projects is mostly free of charge.
Hosting of non-public repositories often requires a paid-for plan or has certain restrictions.
Several self-hosted solutions exist.
Issue Tracker
Overview
Teaching: 15 min
Exercises: 5 minQuestions
How do I use Issues?
Objectives
Filing new issues.
Classifying issues with labels.
Issues are being used for communication between users and developers as well as developers among themselves.
Issues mostly suspected or confirmed bugs, enhancements (feature- requests) or questions on how to use a certain functionality (which in turn might initiate improvements to the documentation).
Each new issue gets a unique ID (number) and the status open.
Developers, users and visitors can communicate back and forth by leaving comments. Once the issue is resolved (bug has been fixed or ruled out, new feature has been implemented or rejected), the issue is closed and becomes inactive.
If code is changed in response to an issue, one can (and should) cross- reference the commit and the issue. This can be done in two ways:
- Add the issue ID to the commit message, e.g.
fixes: #1,resolves: #2orimplements #3. Some platforms will automatically close the referenced issue. - Mention one or more commit IDs (either short or long form)
in articles of the issue, e.g.:
fixed by: a1b2c3d.
Most platforms support tagging issues with custom labels. This helps classifying them (bug, enhancement, cleanup, priority, etc.). Many allow also to assign them to a milestone (each milestone shows the number of issues that are still open / already closed). Issues can also be assigned to a developer who will work on it, letting other developers know this is going to be taken care of.
Issues are searchable by state, label, full-text, etc. (“Didn’t something similar happen 2 years ago? How exactly did we solve it?”)
Create an Issue
- Go to your
recipesrepository on GitHub from the first Git workshop, (or to the one of your instructor).- Switch to the Issues tab
- Click on [New Issue]
- Enter a title and comment.
- Use various formatting options in the toolbar.
- Use the Preview tab.
You can switch back and forth between the Write and Preview tabs to test out the formatting.- Submit the issue.
Check the Project Settings
Most sites allow to enable/disable the issue tracker for each repository in the settings. Whether it is enabled or disabled for a new repository depends on the default settings of the site. Maybe you need to change the state in the repository’s settings.
Milestones
Milestones are a way to keep track on how far along you are on the way to
the next release. You can create Milestones for your next releases,
like for the next Major-release (e.g. v1.0) as well as the next Minor-release
(e.g. v0.5), etc. Then you can attach issues to these different milestones:
- An important bug that should be fixed for the next patch release.
- A not so important bug that needs to go into the next minor release.
- An easy new feature that should be ready for the next minor release as well.
- A more difficult feature that will have to wait for the next Major release.
- Some interesting idea that will have to wait until Version 2.0
You can get an overview that e.g. 9 out of 10 issues for the next patch release have already been closed. Just the one and you can release it.
The next minor release has still 10 open issues so still a bit to.
Key Points
Issues are used to plan further development.
Developers and users will communicate so that developers can reproduce bugs.
Enhancements and feature requests are discussed, working out the expected use-cases as well as parts of the implementation.
Issues of bugs and enhancements that cannot be immediately be resolved stay open so that they are not forgotten.
Forking a Repository
Overview
Teaching: 10 min
Exercises: 10 minQuestions
How can I make an online copy of a repository on which I can work?
Objectives
Create an online copy of a repository under your own account.
Forking a repository on a Git hosting site creates a copy of the repository under your own user account, thereby keeping a link to the original repository. This only works within the same platform, i.e. you need to have an account on the same platform as the original repository.
When forking a repository, this basically runs git clone ... on the server.
The remote origin pointing to the original repository remains intact.
This allows us to contribute changes/commits back to the original repository by a process called “Pull Request” or “Merge Request” (more on that later).
Forks vs. Import
Instead of forking a repository, you can also choose to import a repository. This also runs a
git clone ...on the server, however removes the link to the original repository. The two repositories are now separated and independent from each other.Importing repositories also works across different platforms.
When several people work on a software project, each developer typically starts by forking the repository to their own user-account. They then own that copy and can work on implementing an enhancement or fixing a bug.
Create a Fork
- Go to your instructor’s
testing_demorepository on GitHub.- Click on the “Fork” button.
- Wait a few moments until the repository has been copied
- Explore your forked repository.
Fork the correct repository!
The idea here is that
- the instructor forks the original (template) testing_demo repository and
- the workshop attendees will fork the instructor’s fork of the testing_demo repo.
In the end, the fork-tree should look something like this for a workshop with five attendees:
flowchart RL A( acenet-arc /
testing_demo ) ; B[ instructor /
testing_demo ] -- fork of --> A ; subgraph Used in the workshop C1[ attendee1 /
testing_demo ] -- fork of --> B ; C2[ attendee2 /
testing_demo ] -- fork of --> B ; C3[ attendee3 /
testing_demo ] -- fork of --> B ; C4[ attendee4 /
testing_demo ] -- fork of --> B ; C5[ attendee5 /
testing_demo ] -- fork of --> B ; endThe original repository will remain in its initial state and issues and pull requests will only be created towards the instructor’s fork of the repository.
Key Points
By forking a repository you create a copy under your own account.
You can use this ‘fork’ to develop you own feature or fix a bug that’s bugging you.
This can be the base for contributing these changes back to the original project.
Sometimes however it is used to initiate an independent spin-off that will diverge over time.
Pull Requests
Overview
Teaching: 15 min
Exercises: 10 minQuestions
How do I contribute changes to someone else’s project?
Objectives
Contribute changes that are within your hosted repository back to the original one.
Pull requests are a method of merging commits between repositories that have been forked. GitLab calls them “merge requests” but they are exactly the same thing. We will continue to call them “pull requests” in these lessons. Often they are abbreviated as PR.
You can fork any repository that you have at least read-access to, start implementing an enhancement, fixing bugs or typos, improving documentation, etc. When you feel you are done with your improvement, you open a pull request.
Like Issues each pull request gets a unique ID, a title and an initial comment. Conversations are possible by posing additional comments. In addition to that, all commits that have been made to the forked repository that are not already in the origin repository will be attached to the pull request.
The owner of the original repository (or any developer who has been granted sufficient rights by the owner) can merge the commits of the pull request into the original repository from the website and thereby close the pull request.
Submit a Pull Request
- Go to your forked repository on the website.
- Clone it to your Desktop using
git clone ...in the Unix Shell:$ git clone git@github.com:<Your_GitHub_Username>/testing_demo.git $ cd testing_demo $ lsmore_files mean.py README.md Workflow.md- Copy the file
test_mean.txtfrom themore_filesdirectory to the root of the repo astest_mean.py. (the same folder that containsREADME.mdandmean.py).- Add the file
test_mean.py, make a commit and push to GitHub:$ cp more_files/test_mean.txt ./test_mean.py $ git add test_mean.py $ git commit -m "adding unit tests" $ git push origin main- Go back to the GitHub website and open a pull request (button: [New Pull Request]). Make sure to open the pull request towards the instructor’s fork of the repository.
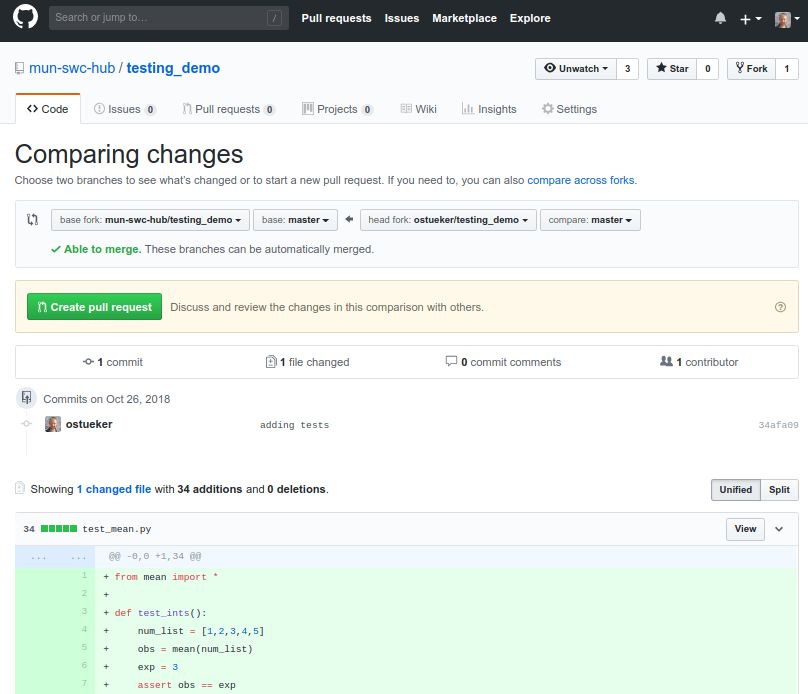
Choose the Right Branch
When creating a pull request you have to choose the correct repositories:
- base-fork - the repository to which the changes should be merged.
- head-fork - the repository from which the changes should be merged. Some repositories have multiple branches (lines of development.) Make sure you select the right ones.
Look at the list of commits as well as the changes (diffs) below to make sure your settings are correct.
Make Sure Your Pull Request can be Merged
When opening a new pull request you will wither see: “✓ Able to merge” or: “✘ Can’t automatically merge”.
The second can happen when commits have been made (or merged) to the original repository since it has been forked.
In this case:
- merge the current state of the original repository into the fork,
- resolve the merge conflicts
- test that your contribution still works as expected
- now open the pull request.
Contribution Guidelines
If you are trying to contribute changes to a project, first check if there is a Contribution Guide. It is often a document called
CONTRIBUTING,CONTRIBUTING.mdor similar and is located in a repository’s root, docs, or .github directory.In this guide the project’s maintainers can describe how they like to receive contributions and things that they pay special attention to, for example:
- code must follow a certain coding style
- code must have proper documentation
- code must have associated unit tests
- all tests must pass
- pull requests must be made towards a certain branch
But it often also contains things like:
- Links to external documentation, mailing lists, or a code of conduct.
- Community and behavioral expectations.
Please be polite and follow the Contribution Guide. Your pull request likely won’t be accepted until it follows the guidelines. Therefore you might as well follow the steps right away.
If your own project accepts contributions from other developers, consider creating a
CONTRIBUTINGof your own.
Key Points
Pull requests are used to merge commits between repositories that share a common ancestor.
Like issues contributors and maintainers can communicate via comments.
Commits that are pushed to the branch that is to be merged become part of the PR.
Once a maintainer is satisfied with the contribution, they merge the pull request.
Pull requests are closed by either merging or rejecting them.
Code Review
Overview
Teaching: 15 min
Exercises: 5 minQuestions
Why should I do Code Review and how can I do it?
Objectives
Learn how to review someone’s pull request.
Code Review is a practice in software development, where one or more other human “reviewers” read the source-code contributions of a contributor before they are merged into the project.
This is done for many reasons, e.g the ones listed by Wikipedia:
Goals of Code Review
- Better code quality - improve internal code quality and maintainability (readability, uniformity, understandability, …)
- Finding defects - improve quality regarding external aspects, especially correctness, but also find performance problems, security vulnerabilities, injected malware, …
- Learning/Knowledge transfer - help in transferring knowledge about the codebase, solution approaches, expectations regarding quality, etc; both to the reviewers as well as to the author
- Increase sense of mutual responsibility - increase a sense of collective code ownership and solidarity
- Finding better solutions - generate ideas for new and better solutions and ideas that transcend the specific code at hand.
- Complying to QA guidelines - Code reviews are mandatory in some contexts, e.g., air traffic software
It is indeed considered to be a good practice, as long as happens in a respectful manner and with constructive criticism between the reviewer and the contributor.
Some projects even enforce that every pull request has to be reviewed by at least a certain number of other developers (this feature is often part of the non-free plans of Git-Collaboration sites).
Once a pull request has been opened, you can go to the pull request (in the destination repository, click on the “Pull requests” tab, select it from the list) and then go to the “Files changed” tab. There the reviewer can read all proposed changes that are part of the pull request - (added lines are highlighted green, removed ones red and changed lines show the old version in red and new one in green) - and then click on the [+] icon next to a line and leave a related comment with suggestions and continue with other lines and files.
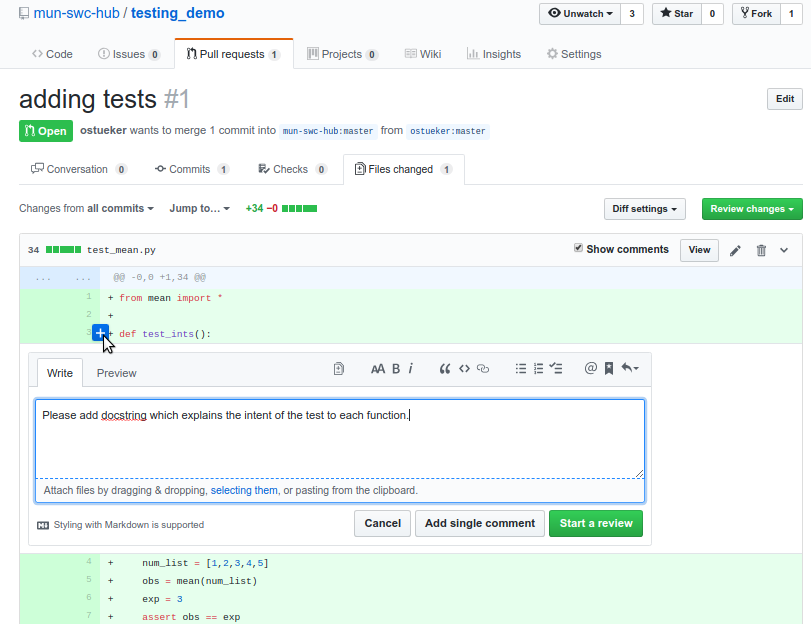
Here it is important for the reviewer to leave constructive feedback and if possible an explanation on why they think something should be done in a different way. A reviewer can also ask for clarification on certain parts of the code, which might be an indication that the implementation is too complex or is lacking documentation.
Finally reviewers, contributors as well as other users can leave comments on the “Conversation”-tab to discuss the change.
The contributor will get notifications about new comments to the pull request and can read the comments and reply to them. Further the contributor can implement the agreed upon changes and commit and push them to their repository.
All commits that are pushed to the branch will be appended to the pull request.
Review a Pull Request
In the last lesson all attendees have opened a pull request towards the instructor’s repository. Identify the pull request opened by your neighbor and review it by adding a few comments to the “changed files”.
Key Points
Code review increases code quality.
The reviewer checks whether the contribution conforms to the set standards.
When has »I promise I’ll write the documentation/tests later!« ever worked?
A second pair of eyes might find a more elegant solution.
The reviewer might learn something new when reading someone else’s code.
Continuous Integration (CI)
Overview
Teaching: 15 min
Exercises: 10 minQuestions
How can I run tests automatically?
Objectives
Short introduction to Continuous Integration.
Setting up Continuous Integration for a Python project with GitHub Actions.
Additional examples for GitLab-CI and Bitbucket pipelines.
Devising a number of automated tests that are testing all “bits of code” if everything is working correctly – called Unit Tests – has become a good practice in software development.
But having a large set-suite is only helpful when you run it in it’s entirety on a regular basis. Otherwise you risk to miss side-effects of your changes for too long and it becomes more difficult to track down which change caused the test(s) to break when there have been too many changes since the test was last used.
The practice that is designed to help with that is called Continuous Integration and is abbreviated as CI. CI automates building and/or running a test-suite whenever changes are pushed to the repository on the server or whenever a pull request is opened.
Continuous Integration is often combined with Continuous Delivery (CD),
where changes to a software are put into production either fully automatically,
once all tests have passed, or semi-automatically where a designated developer
just has to trigger the otherwise fully-automatic roll-out.
This could either mean automatically deploying code on a server whenever code has
changed or packaging and uploading uploading release-bundles anytime a new version is tagged –
however always under the condition that all tests are passing.
Together they are commonly referred to as a CI/CD Pipeline.
The three major Git-Hosting websites have CI/CD-pipelines directly built-in: GitHub Actions, GitLab-CI and Bitbucket Pipelines. There are also external services like Travis-CI and Circle-CI.
All of those services count the number of minutes these pipelines run on their servers and have different restrictions on how long the service can be used for free and from which point a project has to pay:
- GitHub Actions’s free plan includes 2,000 pipeline minutes/month for public repositories.
- GitLab.com’s free plan includes 400 CI pipeline minutes per group per month.
- Bitbucket’s free plan includes 50 pipeline minutes per month and their Academic plan includes 500 free minutes per month.
(as of October 2021)
Both GitHub and GitLab also allow you to use your own GitLab runners that are running on your computer. Using private runners is free of charge and the minutes that these runners are working are not billed.
These three CI-pipeline services have in common that they are configured
with a single text file in the YAML format, which for GitHub Actions
is placed in a directory called .github/workflows and for other services into the
root directory of a project with a specific name:
.gitlab-ci.yml for GitLab, bitbucket-pipelines.yml for Bitbucket and
.travis.yml for Travis-CI.
These files need to contain information about all steps that are needed to test and optionally deploy the software. Typical steps include:
- create a test environment
- clear or pre-populate caches
- install all dependencies
- compile the code
- run tests
- deploy code
- clean up
However not all of the steps are needed or desired in all cases.
Example files
Each of the CI services introduced here uses YAML as the file format – a way of encoding nested lists and dictionaries – in which the pipelines are described, however everyone uses a different set of rules about how certain elements should be named and how they should be nested. All services provide a good number of example files for several supported languages which can be used as a starting point.
The examples below all do basically the same thing: running the unit-tests of a Python project after installing all dependencies. The GitHub and GitLab examples run the tests with two versions of Python (2.7 and 3.8) the Bitbucket example only tests with Python 3.8.
GitHub Actions
# .github/workflows/github-actions.yml
name: learn-github-actions
on: [push]
jobs:
  test-my-python-code:
    # select the os-image these jobs should run on
    runs-on: ubuntu-latest

    # define the Python versions that should be used
    strategy:
      matrix:
        python-version: [2.7, 3.8]

    steps:
      # step to check out the repository
      - uses: actions/checkout@v2

      # step to create the Python environment
      - name: Set up Python ${{ matrix.python-version }}
        uses: actions/setup-python@v2
        with:
          python-version: ${{ matrix.python-version }}

      # step to install the dependencies
      - name: Install dependencies
        run: "pip install -r requirements.txt"

      # step to run tests
      - run: pytest -v
GitLab-CI
# ./.gitlab-ci.yml
test:2.7:
  image: python:2.7
  # step to install dependencies
  before_script:
    - python -V
    - pip install -r requirements.txt
  # step to run tests
  script:
    - pytest -v

test:3.8:
  image: python:3.8
  # step to install dependencies
  before_script:
    - python -V
    - pip install -r requirements.txt
  # step to run tests
  script:
    - pytest -v
Bitbucket-Pipeline
Getting Started with Bitbucket Pipelines
# ./bitbucket-pipelines.yml
image: python:3.8
pipelines:
  default:
    # step to install dependencies
    - step:
        name: install dependencies
        caches:
          - pip
        script:
          - python -V
          - pip install -r requirements.txt
    # step to run all tests
    - step:
        name: run all tests
        script:
          - pytest -v
Getting Started with GitHub Actions
Let’s get our feet wet with GitHub Actions.
Getting Started with GitHub Actions
- Go to the cloned
testing_demorepository on your computer.- Create the
.githuband.github/workflowsdirectories:mkdir .github mkdir .github/workflows- Copy the prepared
more_files/github-actions.ymlfile to the.github/workflowsdirectory, as well as therequirements.txtto the root, then commit the change and push to GitHub:testing_demo $ cp more_files/github-actions.yml .github/workflows testing_demo $ cp more_files/requirements.txt ./ testing_demo $ git add .github/workflows testing_demo $ git add requirements.txt testing_demo $ git commit -m "add GitHub Actions" testing_demo $ git push origin main- Go to the “Commits” page of your repository on GitHub.
- a yellow ● indicates testing is in progress,
- a green ✔ indicates all tests passed.
- a red ✖ indicates that there are failed tests,
- Refresh the browser every 10 seconds until a ✖ appears.
- Click on the red ✖ next to the latest commit, and then on “Details”.
- Try to fix the error in the Python code, commit and push the change and then see if the tests pass.
A Second Look at the Pipeline definitions
Let’s have another look at the pipeline definitions to see what they are actually doing.
GitHub Actions revisited
Let’s go over this workflow line by line:
name: learn-github-actions
on: [push]
jobs:
  test-my-python-code:
    runs-on: ubuntu-latest
    strategy:
      matrix:
        python-version: [2.7, 3.8]

    steps:
      - uses: actions/checkout@v2

      - name: Set up Python ${{ matrix.python-version }}
        uses: actions/setup-python@v2
        with:
          python-version: ${{ matrix.python-version }}

      - name: Install dependencies
        run: "pip install -r requirements.txt"

      - run: pytest -v
- This line defines the name of the workflow and will appear in the ‘Actions’ tab of the GitHub
repository.
name: learn-github-actions - This line specifies that this workflow should be executed whenever commits are pushed to the
repository (a “push-event”). It is possible to set the pipeline to only run for pull requests or
to only run the workflow only on certain branches or paths or tags.
See: Workflow syntax for GitHub Actions for more information.
on: [push] - An event (like a push) triggers the workflow that can consist of one or more jobs and each job can
consist of one or more steps, for example:
jobs:
  job1:
    steps:
      - run:  command
      - run:  command
  job2:
    steps:
      - run:  command
      - run:  command
Also the name for each job can be defined, e.g.
job1andjob2or something more descriptive liketest-my-python-code.jobs: test-my-python-code: steps: - run: command - run: command - This configures the job to run on an Ubuntu Linux runner. Other operating systems and versions
are available as well. Each job will run on a fresh virtual machine (or container).
See Workflow syntax for GitHub Actions for more information.
runs-on: ubuntu-latest - These lines define that this job should be executed multiple times with two different Python
versions, 2.7 and 3.8.
The test matrix could also involve multiple operating systems (e.g. Linux, Windows, macOS),
however keep in mind that testing with e.g. three python-versions on three different operating
systems already generates 9 jobs.
Running all of these on every commit can quickly deplete the available pipeline-minutes.
strategy: matrix: python-version: [2.7, 3.8] -
This contains a list of steps that should be executed within the job. Let’s look at the four steps and start with the simplest:
steps: - uses: actions/checkout@v2 - uses: actions/setup-python@v2 - run: pip install -r requirements.txt - run: pytest-
This step just runs the command
pytest. That wasn’t too hard, was it?- run: pytest -v -
Next we have a step consisting of two lines. The second line runs a
pip installcommands to install the required Python packages defined in therequirements.txtfile. The first line defines a name for this step that will show up in the pipeline logs. If we would not define the name, this step would show up as “Run pip install -r requirements.txt”.- name: Install dependencies run: "pip install -r requirements.txt" -
This step doesn’t execute a simple shell command, but rather calls an external “action” with the name “action/checkout” in its version “v2” (this is the version of the action, not of our code!). This action will checkout the current git repository so that the tests can be executed. Details for this action can be found at: github.com/actions/checkout
- uses: actions/checkout@v2 -
The following lines will also use an “action”, this time actions/setup-python@v2, which creates a Python environment for a particular Python version. The lines
with:>python-version: $will set the variablepython-versionthat is used by thesetup-pythonaction to the current value ofmatrix.python-versionfrom our test-matrix.
Finally this step also defines a name that includes the Python version from the variable.- name: Set up Python ${{ matrix.python-version }}; uses: actions/setup-python@v2 with: python-version: ${{ matrix.python-version }}
-
Other CI solutions
There are also other Build/CI/CD services and tools that can be use as an alternative to those provided by the Git-Hosting services.
The cloud services Travis-CI and Circle-CI work similar to the methods described above, in that they are also controlled by YAML files that are added to the repositories. The only additional steps that are needed is to sign up for an account with the service and to link the cloud-service to the repository in the project’s settings menu under “Integrations”.
Jenkins and other similar tools, been around much longer than the services described
above, and it requires that you can install on your own machine and can be used with any version
control solution. Running the pipelines can then either be triggered by web-hooks (the Source code
repository calls a certain URL when a new commit has been pushed) or on a defined schedule (cron-job).
Jenkins also doesn’t use YAML to describe the pipelines, but has its own “Domain Specific
Language” for it’s Jenkinsfiles.
Also in terms of their use however is quite different from the services introduced above and they
are beyond the scope of this lesson.
Key Points
Running automated tests often helps tracking down bugs early.
With CI, tests are being executed anytime changes are pushed to the repository.
CD is used to automate the deployment of new releases.
Tags and Releases
Overview
Teaching: 10 min
Exercises: 5 minQuestions
How do you create releases of your project?
Objectives
Tagging commits in the repository.
Creating a release.
Using semantic versioning.
Creating a DOI for a release.
At some point you want share a certain state of the development of your software project with other users. At this point you will probably want to give that state a version number, as it helps identifying the exact version a user is using when tracking down problems. This is referred to as “Releasing a Software” or “Making a (Software) Release”.
Releases and Tags
Making a release of a software project that is managed by a version control
system like Git is done essentially by creating a so called Tag, a name/label
that is permanently attached to specific commit to identify reference it later on.
This can be done either using the git tag -a <tagname> command, and then
pushing the tag using git push origin <tagname> or git push origin --tags.
More conveniently this can also be done on the website of the repository:
- On GitHub:
- On the main “<> Code”-tab go to the “releases”-tab.
- Click on [Create a new release]
- Enter a Tag version (tag-name; e.g. v0.1.0), release title (message) and description (release notes).
- Make sure you are tagging the correct commit (correct branch or specific commit).
- Optionally attach additional files (e.g. source, binary or installer packages).
If you don’t attach any files, automatic links to archives (
.tar.gzand.zip) of the Tag’s source tree are automatically generated. - Click [Publish Release]
- On GitLab:
- In the menu go to Repository > Tags
- Click on “New Tag”
- Enter a “Tag name” (version), “Release Title” (message) and description (Release Notes).
- Make sure you are tagging the correct commit (correct branch or specific commit).
- Optionally attach additional files. A tag’s source tree can be downloaded
on the “Tags” tab as (
.zip,.tar.gzor.tar.bz2).
- On Bitbucket:
- In the menu go to Commits and there on the desired commit.
- On the right side click on the [+] “Create a tag” (next to “No tags”).
- Enter a tag-name and description.
- Go to downloads to (optionally) add additional files.
Any tag’s source tree can be downloaded on the “Tags” tab as (
.zip,.tar.gzor.tar.bz2).
The description/Release Notes can be edited later, but the tag-name and message will be immutable.
Creating a Release typically consists of the following steps:
- Increment the version attribute to the desired version within the source code. Ideally you only have to do this in a single place, e.g. a build-script.
- Create a new commit that contains the new version attribute. Ideally you have already committed all other changes and this commit only contains changes to the version attribute.
- Create a new Tag which has the name of the released version and a message.
- Publish Release Notes
- Optionally Upload additional release files
- Change the version attribute in the source code by appending e.g.
-devand commit that change, to indicate that the source-tree is in a development state.
Semantic Versioning
Semantic Versioning is a versioning scheme that carries some basic information encoded in the version number from which a user can judge how easy or difficult it will be to upgrade to a new version.
Semantic version numbers are created with the pattern Major.Minor.Patch each
of them is a non-negative integer (and may have multiple digits).
Incrementing each of the numbers is done based on three rules:
- Major is incremented whenever you make incompatible changes.
- Minor is incremented whenever you make functional changes in a backwards-compatible way.
- Patch is incremented when a release contains only backwards-compatible fixes.
When one of these numbers is incremented all lower-order numbers are set back to
zero. Pre-releases or development snapshots can also have a version suffix delimited
by a dash -. For example:
X.Y.Z-dev: A development snapshot leading up to versionX.Y.ZX.Y.Z-alpha: An “alpha” release leading up to versionX.Y.Zintended for internal testing.X.Y.Z-beta2: The second “beta” release leading up to versionX.Y.Zintended for external testing.X.Y.Z-rc1: The first “Release Candidate” of upcoming versionX.Y.Z. If no significant errors are found, this commit could also receive thevX.Y.Ztag, otherwise a-rc2release might follow.
A special case is also the Major version zero (0.Y.Z) as it is used for initial development. Anything may change at any time. The public API should not be considered stable.
Re-releasing under the same version number.
I’ve just yesterday released version X.Y.Z but now I’ve found a little bug.
Can I just fix it and re-use the same version number? People probably won’t notice it anyway.Solution:
No. Don’t. Don’t even think of it. NO, NO, NO!!!
If you have created a tag locally and haven’t pushed it to a public repository, you can actually do that, but otherwise this should never be done as it can confuse users packagers and others later on.
Version numbers don’t cost you anything just release a new Patch release, that contains only the one bugfix.
Citable Releases (doi)
Zenodo is a service that allows uploading different kinds of research output like publications, posters, presentations, data-sets, images, video/audio recordings, software, lessons, etc. (up to 50GB per dataset) and can issue a Digital Object Identifier (DIO) for each published upload. In this way you can make each of your software releases citable – by yourself or other users. They can be annotated with bibliographical- (e.g. the names and ORCID of the authors), license-, funding- and other information.
The goal for this is that publications can cite the exact versions of the used software as well as datasets or even supplemental data, which can lead to better reproducible research.
Zenodo is integrated with GitHub, so that you can enable GitHub repositories in Zenodo and anytime you create a new release, it is automatically added to Zenodo, and issued a DIO there. If you are using a different service like GitLab or Bitbucket, you can still upload releases manually.
Be Aware
Once something has been published on Zenodo, this cannot be undone!
Zenodo is funded by OpenAIRE (“Open Access Infrastructure for Research in Europe”) and data is stored in the CERN Data Center.
Key Points
Software releases add version numbers to specific states within the development cycle.
This is done by attaching Tags – immutable labels – to a certain commit.
Using ‘Semantic Versioning’ helps to communicate to a user what they can expect when upgrading.
Never change a release retroactively or re-release the same version with different content.
With Zenodo you can get a DOI for any release hosted on GitHub, making that version citable.
Branches
Overview
Teaching: 15 min
Exercises: 15 minQuestions
What are git branches?
Why, when and how are branches used?
Objectives
Learn how to create branches.
Learn how to switch branches.
Learn how to merge branches.
Learn how to delete unused branches.
Why should we use branches?
Branches are used to manage different versions of a project. Typical uses of branches are:
- main development branch is maintained in working order
- feature branches are used to develop new features and/or other improvements
- bug fix branches are used to fix bugs
- code review and testing takes place before branches are merged into the main development branch to maintain quality of the code and avoid breaking the main development branch.
This has the advantage that even drastic or experimental changes can be tried in a separate branch without breaking the code in the main development branch.
Git Sandbox
We will practice a bit in an online “Git Sandbox” at: https://learngitbranching.js.org/?NODEMO. This sandbox allows us to quickly explore a larger git repository history without spending time editing files and speeds up the commit process. It is a good way to gain experience quickly with processes that usually happen over weeks. However, the Git Sandbox isn’t a 1:1 simulation of git and some commands operate a little differently than they do in git. Mostly though, we don’t have to worry too much about that.
The Git Sandbox lets us use simplified commands such as:
git addgit commitgit statusgit checkoutgit branchgit mergegit clone
In this simplified environment we can skip the steps of creating and modifying files. Even the use of git add is optional and we will skip it for brevity.
The Git Sandbox command git clone allows us to duplicate our simulated repository and simulate working with remote repositories.
Git Sandbox even has some commands that git doesn’t. For example:
undogit fakeTeamwork
The undo command will undo the last command you ran and the git fakeTeamwork <branch> <num-commits> allows us to fake work happening on our simulated “remote” repository.
More Git Sandbox details
For more details on using the Git Sandbox see its github repository. The Git Sandbox even has a built in tutorial which you can access here which covers both how to use the Git Sandbox and also using git.
Creating and switching branches
-
We start with a git repo that has two commits (c0 and c1) and a single branch
mainat c1, which is active (checked-out) and therefore gets the labelHEAD(as we have learned in the episode Exploring History in the lesson “Version Control with Git”):flowchart RL c0((c0)) c1((c1)) ==> c0 l1([main]) --> c1 HEAD([HEAD]) --> l1 classDef label fill:#ff1,stroke:#333,stroke-width:2px; classDef head fill:#f81,stroke:#333,stroke-width:2px; class l1 label class HEAD head -
Next we create a new branch and make a commit (c2) with:
$ git branch feature1
$ git commit
flowchart RL c0((c0)) c1((c1)) ==> c0 c2((c2)) ==> c1 l1([main]) --> c2 l2([feature1]) --> c1 HEAD([HEAD]) --> l1 classDef label fill:#ff1,stroke:#333,stroke-width:2px; classDef head fill:#f81,stroke:#333,stroke-width:2px; class l1,l2 label class HEAD headWhat has just happened?
Q: Why did our commit c2 end up in branch
mainand not infeature1?Solution
A: Because
git branchhas only created a new branch but not switched the active branch. -
We switch to the branch
feature1and make a commit (c3) with:$ git checkout feature1 $ git commitflowchart RL c0((c0)) c1((c1)) ==> c0 c2((c2)) ==> c1 c3((c3)) ==> c1 l1([main]) --> c2 l2([feature1]) --> c3 HEAD([HEAD]) --> l2 classDef label fill:#ff1,stroke:#333,stroke-width:2px; classDef head fill:#f81,stroke:#333,stroke-width:2px; class l1,l2 label class HEAD head -
Let’s make two more commits (c4 and c5) to the
feature1branch:$ git commit $ git commitflowchart RL c0((c0)) c1((c1)) ==> c0 c2((c2)) ==> c1 c3((c3)) ==> c1 c4((c4)) ==> c3 c5((c5)) ==> c4 l1([main]) --> c2 l2([feature1]) --> c5 HEAD([HEAD]) --> l2 classDef label fill:#ff1,stroke:#333,stroke-width:2px; classDef head fill:#f81,stroke:#333,stroke-width:2px; class l1,l2 label class HEAD headEven though the new feature is now complete, it needs code review and some thorough testing. We have pushed the feature1 branch to the remote repository with
git push origin feature1.While a colleague reviews the code, they check out this branch and start running some extensive tests systems. Until that is done, we can start working on something else.
We can fake this in the git sandbox by running:
$ git clone
This can be thought of a little bit as creating a remote copy of our repository, in which our colleague will work and push changes to.
-
We start working on a second feature. First we switch back to our main branch before creating a new one.
$ git checkout mainThis time we combine creating a new branch and switching to it in a single command, followed by a commit (c6):
$ git checkout -b feature2
$ git commit
flowchart RL c0((c0)) c1((c1)) ==> c0 c2((c2)) ==> c1 c3((c3)) ==> c1 c4((c4)) ==> c3 c5((c5)) ==> c4 c6((c6)) ==> c2 l1([main]) --> c2 l2([feature1]) --> c5 l3([feature2]) --> c6 HEAD([HEAD]) --> l3 classDef label fill:#ff1,stroke:#333,stroke-width:2px; classDef head fill:#f81,stroke:#333,stroke-width:2px; class l1,l2,l3 label class HEAD head -
Someone found a bug in our
mainbranch, that was likely introduced with c2, sofeature1is not affected. Ourfeature2is not ready yet, but we urgently need to get the bug fixed inmain. We start by checking-outmainand then create and switch tobugfix3.Challenge
Q: What commands do we need for that?
Solution
$ git checkout main
$ git branch bugfix3
$ git checkout bugfix3
or even shorter:
$ git checkout main
$ git checkout -b bugfix3
flowchart RL c0((c0)) c1((c1)) ==> c0 c2((c2)) ==> c1 c3((c3)) ==> c1 c4((c4)) ==> c3 c5((c5)) ==> c4 c6((c6)) ==> c2 l1([main]) --> c2 l2([feature1]) --> c5 l3([feature2]) --> c6 l4([bugfix3]) --> c2 HEAD([HEAD]) --> l4 classDef label fill:#ff1,stroke:#333,stroke-width:2px; classDef head fill:#f81,stroke:#333,stroke-width:2px; class l1,l2,l3,l4 label class HEAD headWe then make two commits (c7 and c8) to the
bugfix3branch:$ git commit $ git commitflowchart RL c0((c0)) c1((c1)) ==> c0 c2((c2)) ==> c1 c3((c3)) ==> c1 c4((c4)) ==> c3 c5((c5)) ==> c4 c6((c6)) ==> c2 c7((c7)) ==> c2 c8((c8)) ==> c7 l1([main]) --> c2 l2([feature1]) --> c5 l3([feature2]) --> c6 l4([bugfix3]) --> c8 HEAD([HEAD]) --> l4 classDef label fill:#ff1,stroke:#333,stroke-width:2px; classDef head fill:#f81,stroke:#333,stroke-width:2px; class l1,l2,l3,l4 label class HEAD headThe bug is fixed. Well done! Now we need to integrate that fix into the
mainbranch, so that others can use it.
Merging branches
The bugfix3 has quickly been tested and reviewed (it was a quite simple fix), so we now want to
merge it into the main branch.
-
First we need to change to the
mainbranch:$ git checkout mainflowchart RL c0((c0)) c1((c1)) ==> c0 c2((c2)) ==> c1 c3((c3)) ==> c1 c4((c4)) ==> c3 c5((c5)) ==> c4 c6((c6)) ==> c2 c7((c7)) ==> c2 c8((c8)) ==> c7 l1([main]) --> c2 l2([feature1]) --> c5 l3([feature2]) --> c6 l4([bugfix3]) --> c8 HEAD([HEAD]) --> l1 classDef label fill:#ff1,stroke:#333,stroke-width:2px; classDef head fill:#f81,stroke:#333,stroke-width:2px; class l1,l2,l3,l4 label class HEAD headHow does the merge work?
Q: What needs to happen, to get the commits c7 and c8 into the
mainbranch?A: Essentially we need for c8 to become the new state for the main branch. All that needs to be done is move the label for branch
maintwo commits further down the tree.flowchart RL c0((c0)) c1((c1)) ==> c0 c2((c2)) ==> c1 c3((c3)) ==> c1 c4((c4)) ==> c3 c5((c5)) ==> c4 c6((c6)) ==> c2 c7((c7)) ==> c2 c8((c8)) ==> c7 l1([main]) --> c2 l2([feature1]) --> c5 l3([feature2]) --> c6 l4([bugfix3]) --> c8 HEAD([HEAD]) --> l1 l1 -.-> c8 classDef label fill:#ff1,stroke:#333,stroke-width:2px; classDef head fill:#f81,stroke:#333,stroke-width:2px; class l1,l2,l3,l4 label class HEAD headThis is also called a “Fast Forward” merge (FF-merge), because a branch-label is just moved along an existing chain of commits.
-
We use the
mergecommand to merge the branchbugfix3into the current branchmain.$ git merge bugfix3flowchart RL c0((c0)) c1((c1)) ==> c0 c2((c2)) ==> c1 c3((c3)) ==> c1 c4((c4)) ==> c3 c5((c5)) ==> c4 c6((c6)) ==> c2 c7((c7)) ==> c2 c8((c8)) ==> c7 l1([main]) --> c8 l2([feature1]) --> c5 l3([feature2]) --> c6 l4([bugfix3]) --> c8 HEAD([HEAD]) --> l1 classDef label fill:#ff1,stroke:#333,stroke-width:2px; classDef head fill:#f81,stroke:#333,stroke-width:2px; class l1,l2,l3,l4 label class HEAD headSure enough, all that has changed is which commit the label
mainpoints to. -
Our colleague reports back to us on
feature1and made a small change (c9), which we now want to pull into our localfeature1branch.$ git fakeTeamwork feature1 1As we don’t want to pull it into the
mainbranch just yet, we switch to thefeature1branch and pull in the changes to our current branch.$ git checkout feature1 $ git pull origin feature1flowchart RL c0((c0)) c1((c1)) ==> c0 c2((c2)) ==> c1 c3((c3)) ==> c1 c4((c4)) ==> c3 c5((c5)) ==> c4 c6((c6)) ==> c2 c7((c7)) ==> c2 c8((c8)) ==> c7 c9((c9)) ==> c5 l1([main]) --> c8 l2([feature1]) --> c9 l3([feature2]) --> c6 l4([bugfix3]) --> c8 HEAD([HEAD]) --> l2 classDef label fill:#ff1,stroke:#333,stroke-width:2px; classDef head fill:#f81,stroke:#333,stroke-width:2px; class l1,l2,l3,l4 label class HEAD head -
After one more round of testing, we decide that
feature1is ready to be merged intomain. We checkout themainbranch andmergein thefeaturebranch.$ git checkout main $ git merge feature1This is not a fast-forward merge as branches
mainandfeature1have diverged. This merge will cause a merge commit c10 to be created that combines the content of c8 and c9.Git will do a fantastic job combining the content from both commits, however if the same line has been changed (or lines in close proximity) on both branches since their last common ancestor, git won’t be able to resolve this on its own and will alert us of a conflict (which was covered in Episode Conflicts of the lesson “Version Control with Git”).
We are lucky and don’t run into a conflict with this merge.
flowchart RL c0((c0)) c1((c1)) ==> c0 c2((c2)) ==> c1 c3((c3)) ==> c1 c4((c4)) ==> c3 c5((c5)) ==> c4 c6((c6)) ==> c2 c7((c7)) ==> c2 c8((c8)) ==> c7 c9((c9)) ==> c5 c10((c10)) ==> c8 c10((c10)) ==> c9 l1([main]) --> c10 l2([feature1]) --> c9 l3([feature2]) --> c6 l4([bugfix3]) --> c8 HEAD([HEAD]) --> l1 classDef label fill:#ff1,stroke:#333,stroke-width:2px; classDef head fill:#f81,stroke:#333,stroke-width:2px; classDef commit fill:#D0D0FF,stroke:#9370DB,stroke-width:2px; class l1,l2,l3,l4 label class HEAD head class c10 commit
Cleaning Up
-
We can now delete the branch
bugfix3, because we no longer need it. We do this with the command:$ git branch -d bugfix3flowchart RL c0((c0)) c1((c1)) ==> c0 c2((c2)) ==> c1 c3((c3)) ==> c1 c4((c4)) ==> c3 c5((c5)) ==> c4 c6((c6)) ==> c2 c7((c7)) ==> c2 c8((c8)) ==> c7 c9((c9)) ==> c5 c10((c10)) ==> c8 c10((c10)) ==> c9 l1([main]) --> c10 l2([feature1]) --> c9 l3([feature2]) --> c6 HEAD([HEAD]) --> l1 classDef label fill:#ff1,stroke:#333,stroke-width:2px; classDef head fill:#f81,stroke:#333,stroke-width:2px; classDef commit fill:#D0D0FF,stroke:#9370DB,stroke-width:2px; class l1,l2,l3,l4 label class HEAD head class c10 commitOnly the label for
bugfix3was removed. Asmainpoints to the same commit thatbugfix3used to point to, we don’t have any “dangling commits” that we might loose access to. The branchfeature1can be removed the same way. -
What will happen if we want to delete branch
feature2? This is actually a place where the Git sandbox diverges from git. Normally with git if you use the-doption to delete a branch, it won’t delete a branch which isn’t fully merged.$ git branch -d feature2error: The branch 'feature2' is not fully merged. If you are sure you want to delete it, run 'git branch -D feature2'.However, in Git Sandbox it will happily do this.
Be Careful When Deleting Un-merged Branches
Here Git warns us that we are about to delete a branch that has not been merged. Without the “label” that is the branch name, we are about to loose access to those commits that have not been merged. Those commits could be irrevocably lost.
The error message will tell us how we can delete the branch anyway. As this feature was only an experiment and didn’t quite turn out how we had hoped, we will in fact delete it:
$ git branch -D feature2flowchart RL c0((c0)) c1((c1)) ==> c0 c2((c2)) ==> c1 c3((c3)) ==> c1 c4((c4)) ==> c3 c5((c5)) ==> c4 c6((c6)) --> c2 c7((c7)) ==> c2 c8((c8)) ==> c7 c9((c9)) ==> c5 c10((c10)) ==> c8 c10((c10)) ==> c9 l1([main]) --> c10 HEAD([HEAD]) --> l1 classDef label fill:#ff1,stroke:#333,stroke-width:2px; classDef head fill:#f81,stroke:#333,stroke-width:2px; classDef commit fill:#D0D0FF,stroke:#9370DB,stroke-width:2px; classDef lostcommit fill:#D0D0FF,stroke:#9370DB,stroke-width:2px,opacity:0.4; linkStyle 5 opacity:0.3; class l1,l2,l3,l4 label class HEAD head class c10 commit class c6 lostcommitCommit c6 is not lost right away but still remains in the depth of the git repo until the garbage collection will remove it. The only way we can get it back is if we still have a record of the commit ID.
Homework
Practice what you have learned.
Working with branches can be a bit daunting at the start. Please practice this for yourself using the guided tutorial from Learn Git Branching and/or experiment in their Git Sandbox like we did in this lesson.
Key Points
git branch bnamecreates a new branchbnamefrom the currently checked-out commit.
git checkout bnameswitches the workspace to the branchbname.
git checkout -b bnamecombines the commandsgit branch bnameandgit checkout bnameand creates the new branchbnameand switches to it with the same command.
git merge bnamemerges the branchbnameinto the currently active branch. It’s always the currently active (checked-out) branch that is being changed.
git branch -d bnamedeletes a branch that has been merged.To delete un-merged branches, we have to force git to delete them by using
-Dinstead of-d. This is to prevent accidentally deleting those branches and loosing data.
Integrated Wiki
Overview
Teaching: 10 min
Exercises: 0 minQuestions
Where can I keep some simple documentation pages?
Objectives
Learn an easy way to host some documentation and/or notes.
Learn how to use Markdown and where to use it.
Sometimes you want to keep some notes about your project and share them with other developers and users. While you could keep them somewhere within the repository, you might decide against doing so because:
- you want to navigate them easily,
- view them formatted and not as plain-text.
- don’t include them in the released source packages.
The introduced services all include a Wiki functionality to do just that.
All of them support:
- Writing pages using Markdown which is then rendered as HTML when browsing the pages.
- Pages can be edited directly on the website with a browser.
- Restrict editing to developers or allow all (registered) users.
- Show a list of all pages as well as place links on one page pointing to another.
- The Wiki is actually stored within a git-repository as well.
What are other projects using the Wiki for:
- Writing a small (maybe preliminary) User’s manual.
- Maintaining a Developer’s Manual
- steps to create a development environment
- commands to build the project
- style guide
- Whitepaper
- Showcase of usage
Markdown primer
Markdown is a lightweight markup-language that looks intuitively nice when viewed as plain-text and renders nicely as HTML with things like bullet- and numbered lists, several levels of headings, sub-headings, sub-sub- headings (etc.), links, included images, code blocks, etc.
These services have expanded the original Markdown specification by additional elements like:
- code-blocks with syntax-highlighting for very many languages
- linking to issues, pull requests, commits, files, lines in files, branches, etc.
- tables
While they often follow the same syntax rules but sometimes differ slightly – especially when it comes to placing links to site features like pull requests.
Therefore each site has a guide to their own Markdown flavor:
The sites not only render Markdown within the Wiki but also in comments,
issues, pull requests, code review, release notes, etc. as well as
files with the *.md and .markdown file extension.
Markdown Examples
format words in **bold** or *italics*

use `inline code` markup
format words in bold or italics
use inline code markup
*   Use asterisks
*   to create
*   bullet lists.
- Use asterisks
- to create
- bullet lists.
1.  Use numbers
1.  to create
1.  numbered lists.
- Use numbers
- to create
- numbered lists.
*  You can use indents
	*  To create sublists
	*  of the same type
*  Or sublists
	1. Of different
	1. types
- You can use indents
- To create sublists
- of the same type
- Or sublists
- Of different
- types
# A Level-1 Heading
A Level-1 Heading
## A Level-2 Heading (etc.)
A Level-2 Heading (etc.)
Line breaks
don't matter.

But blank lines
create new paragraphs.
Line breaks don’t matter.
But blank lines create new paragraphs.
[Create links](http://software-carpentry.org) with `[...](...)`.
Or use [named links][data_carpentry].

[data_carpentry]: http://datacarpentry.org
Create links with [...](...).
Or use named links.
Insert images with ``:

Insert images with :
![]()
A python code-block:
```python
def square(x):
    return x * x
```
Many other languages are supported.
Just change `python` into something else.
A python code-block:
def square(x):
    return x * x
Many other languages are supported.
Just change python into something else.
Most of these examples are taken from: Software Carpentry: Plotting and Programming in Python 2016.
Key Points
Wikis are an easy way to share simple documentation.
Developers can edit the documentation within the browser.
Permissions can be set to allow any user to edit pages.
This allows crowd-sourcing efforts.
As it is stored in a Git repository, changes can always be reverted.
Markdown is a lightweight and rather intuitive markup-language that is widely used.
Pages
Overview
Teaching: 10 min
Exercises: 5 minQuestions
How can I host a simple website?
Objectives
Learn how to host a static website with documentation or a blog on a Git Platform.
Sometimes hosting a few simple Wiki pages is not sufficient for a project and you want to host a small website using your own design or an amount of content that exceeds the capabilities of Wiki pages.
GitHub, GitLab.com and Bitbucket offer hosting pages directly from a Git repository.
When you create a repository with the name <username>.github.io, the content
of that repository will be available under “https://<username>.github.io”.
Other repositories can be set serve pages under “https://<username>.github.io/<reponame>”.
The same methodology applies to GitLab and Bitbucket with the <username>.gitlab.io
and <username>.bitbucket.io domains respectively. GitHub and GitLab also
allow configuring a custom domain, e.g. www.example.com.
Deploying a page with GitHub pages
Let’s try out serving a small page on GitHub from within your testing_demo
repository.
First we need to activate the “Pages” functionality for this repo:
- go to the repository’s settings,
- scroll down to “GitHub Pages”
- in the dropdown select main branch / docs folder
- click Save
- we don’t use the Theme Chooser at this point.
Now we go back to our checked out repository:
testing_demo $  git pull origin
testing_demo $  mkdir docs
testing_demo $  cd  docs
In the docs directory we first create a file _config.yml with the following
content:
# _config.yml
# Jekyll configuration
name:  My Cool Page
title: My Cool Page
description: A Documentation Page created with Jekyll
theme: jekyll-theme-architect
Next we create a file index.md with some Markdown content:
<!-- index.md -->
# My Testing Docs Page

It Works! :-)

1. Have a `_config.yml` file setting a `title`, `name`, `description` and `theme`.
2. Add an `index.md` file with the landing page in Markdown.
3. Add more `*.md` files, e.g. `about.md`
4. add a link to [about.md](about) with: `[about.md](about)`
Now we commit the changes and push them to GitHub:
testing_demo $  git add _config.yml index.md
testing_demo $  git commit -m "my first GitHub page"
testing_demo $  git push origin main
Switch back to the browser and reload the settings page. Under the GitHub
pages section you should now see the URL under which the site was published
(https://<username>.github.io/testing_demo/). Click on that link – et violà!
From the data inside the Jekyll configuration file _config.yml
and landing page index.md in Markdown format, a website was build on
the GitHub servers and is now available to be viewed by anyone.
Change the Jekyll theme
Go back to the repository’s settings and use the Theme Chooser to select a different theme.
Notice that this has generated a new commit. Usegit pull originto pull this change into your local repository.
Some notes on GitHub pages
In this example the web-pages are located in a
docssub-directory within the repository. We could have placed the_config.yml,index.mdand other files instead into the repository’s root directory of themainorgh-pagesbranch and selected the appropriate option from the dropdown in the repository’s GitHub-pages settings.Previously GitHub pages had to be hosted from a branch called
gh-pages. This could have been the sole branch of a repository or in addition to amainbranch with code. This is still possible but no longer a requirement.
GitLab pages
GitLab Pages makes use of the GitLab CI. This makes
the GitLab pages a bit more flexible but in turn you must maintain your
.gitlab-ci.yml pipeline definition yourself.
However there are a number of examples for different use-cases that can
be easily adapted.
Bitbucket pages
At the time this material is being created (October 2018), Bitbucket only serves HTML-pages as they are directly from the repository.
Please consult their documentation for more information and features that have been introduced since then.
Documentation
Key Points
GitHub, GitLab and Bitbucket offer a way hosting a website on their platform.
The pages are stored in a Git repository.
The pages are static in a sense that there are no server-side scripts or databases.
GitHub and GitLab offer building pages from e.g. Markdown files with ‘Jekyll’
In those cases Jekyll is executed whenever commits are pushed to the server.
The process works like a CI/CD pipeline.