Introduction
Overview
Teaching: 15 min
Exercises: 5 minQuestions
What is a GPU, and why do we use them?
What is CUDA?
Objectives
To know the names of some GPU programming tools
To get access to a GPU node with Slurm
What is a GPU, and why?
A Graphics Processing Unit is a specialized piece of computer circuitry designed to accelerate the creation of images. GPUs are key to the performance of many current computer games; a machine with only CPUs cannot update the picture on the screen fast enough to make the game playable.
Difference between CPUs and GPUs

| CPUs | GPUs |
|---|---|
| extremely versatile (“Jack of all trades”) | excel at number-crunching |
| task parallelism for diverse tasks | data parallelism (single task) |
| minimize latency | maximize throughput |
| multithreaded | super-threaded |
| SIMD (Single Instruction Multiple Data) | SIMT (Single-Instruction, Multiple-Thread) |
In Summary
A GPU is effectively a small, highly specialized, parallel computer.
The GPU is especially well-suited to address problems that can be expressed as data-parallel computations - the same program is executed on many data elements in parallel - with high arithmetic intensity - the ratio of arithmetic operations to memory operations.
What is CUDA?
There are a number of packages you can use to program GPUs. Prominent ones are CUDA (only for NVIDIA GPUs), OpenCL, OpenACC, ROCm/HIP (only for AMD GPUs) and SYCL.
CUDA is an NVIDIA product. It once stood for Compute Unified Device Architecture, but not even NVIDIA uses that expansion any more. CUDA has two components. One part is a driver that actually handles communications with the card. The second part is a set of libraries that allow your code to interact with the driver portion. CUDA only works with NVIDIA graphics cards.
Why should I learn CUDA if it doesn’t work with AMD GPUs?
In fact the way ROCm/HIP is used to program AMD GPUs is very similar to CUDA and CUDA kernels can easily be transformed into HIP kernels.
As of 2024, only NVIDIA GPUs are in use across ACENET’s and the Alliance’s HPC systems.
Monitoring your graphics card
Along with drivers, library files, and compilers, CUDA comes with several utilities that you can use to manage your work. One very useful tool is ‘nvidia-smi’ which lets you check the basic status of your GPU card, like, “Do I have one?” and “Is it working”. There are also tools for profiling and debugging CUDA code.
nvidia-smi
Running on a GPU node
If you run nvidia-smi on a login node or on a regular compute node, it will complain that
it can’t communicate with the NVIDIA driver. This should be no surprise: No NVIDIA driver
needs to be running on a node that has no GPU.
To get access to a GPU we have to go through
Slurm.
The “normal” way is to use sbatch, which will queue up a job for execution later:
$ cat testjob
#!/bin/bash
#SBATCH --gres=gpu:1    # THIS IS THE KEY LINE
#SBATCH --cpus-per-task=10
#SBATCH --mem=40G
#SBATCH --time=0:5:0
nvidia-smi
$ sbatch testjob
That asks for one GPU card and 10 CPU cores. This would be perfect for the national
Béluga cluster,
since the GPU nodes there have 4 GPUs, 40 CPU cores, and more than 160GB of RAM.
Five minutes of run time is foolishly short for a production job, but we’re testing,
so this should be okay.
Alternatively we could use salloc to request a GPU node, or part of one,
and start an interactive shell there. Because we don’t have enough nodes
on our virtual cluster to provide a GPU for each person in the course, we’ll use
yet a third form that you already saw in a previous week, srun:
$ srun --gres=gpu:1  nvidia-smi
Thu Jun 20 14:39:56 2024
+-----------------------------------------------------------------------------+
| NVIDIA-SMI 470.239.06   Driver Version: 470.239.06   CUDA Version: 11.4     |
|-------------------------------+----------------------+----------------------+
| GPU  Name        Persistence-M| Bus-Id        Disp.A | Volatile Uncorr. ECC |
| Fan  Temp  Perf  Pwr:Usage/Cap|         Memory-Usage | GPU-Util  Compute M. |
|                               |                      |               MIG M. |
|===============================+======================+======================|
|   0  GRID V100D-8C       On   | 00000000:00:05.0 Off |                    0 |
| N/A   N/A    P0    N/A /  N/A |    560MiB /  8192MiB |      0%      Default |
|                               |                      |                  N/A |
+-------------------------------+----------------------+----------------------+

+-----------------------------------------------------------------------------+
| Processes:                                                                  |
|  GPU   GI   CI        PID   Type   Process name                  GPU Memory |
|        ID   ID                                                   Usage      |
|=============================================================================|
|  No running processes found                                                 |
+-----------------------------------------------------------------------------+
Key Points
A GPU (Graphics Processing Unit) is best at data-parallel, arithmetic-intense calculations
CUDA is one of several programming interfaces for general-purpose computing on GPUs
Alliance clusters have special GPU-equipped nodes, which must be requested from the scheduler
Hello World
Overview
Teaching: 15 min
Exercises: 5 minQuestions
How to compile and run Hello World
Objectives
Compile and run some CUDA code
The traditional C-language Hello World program is:
#include <stdio.h>
#include <stdlib.h>

int main(int argc, char **argv) {
   printf("Hello World\n");
}
The CUDA compiler is a C compiler that can generate binary code that will run on CPUs as well as code that will run on GPUs. The compiler is called nvcc. Use it to compile this Hello World with the following command:
nvcc -o hello_world hello_world.c
Command not found?
If you get:
$ nvcc -o hello_world hello_world.c-bash: nvcc: command not found…you may have forgotten to run
module load StdEnv/2020 gcc/9.3.0 cuda/11.4.
To get this to run with a GPU, you need to add some code to create and launch a kernel. A kernel is a portion of code that can be transferred to the GPU and run there. A simple example would look like the following.
#include <stdio.h>
#include <stdlib.h>

__global__ void mykernel(void) {
}

int main(int argc, char **argv) {
   mykernel<<<1,1>>>();
   printf("Hello world\n");
}
You can compile this code with the same command as before, except the file extension must be ‘.cu’ instead of ‘.c’. We added two extra parts to the program. The first part, __global__, tells the compiler that this function will be something that runs on the GPU, but is called from the main program. The second part is the use of angle brackets added to the function call. This is extra syntax used to tell the compiler that this function is to be used as a kernel and to launch it on the GPU. In this case, our kernel function doesn’t do anything. We will add more to it in the next section.
The point of using a GPU is to do massively parallel programs. The two numbers within the angle brackets define how the work is to be divided up among the threads available. The first number defines the number of blocks to break the work up across. These blocks run in parallel. The second number defines the number threads that will work within each of the blocks. So if you have the following, in general,
mykernel<<<M,N>>>();
this sets up your work so that everything is divided into M blocks, with each block having N threads. Since both parameters provide ways of parallelizing your work, you may ask why are there two? Threads not only handle parallelism, but also provide ways of communicating and synchronizing between the threads. This gives you the tools you need to handle more complex algorithms.
Running on a GPU node
You could execute hello_world on the login node simply by naming it:
$ ./hello_world
Hello World
But the login nodes on the cluster we’re using don’t have GPUs, so how does that work? You could run it on a GPU node using
$ srun --gres=gpu:1 hello_world
Hello World
as shown in the previous episode, but the result will be the same because this code doesn’t actually do anything with the GPU yet. Let’s fix that next.
Key Points
Use nvcc to compile
CUDA source files are suffixed .cu
Use salloc to get an interactive session on a GPU node for testing
Adding Two Integers
Overview
Teaching: 10 min
Exercises: 15 minQuestions
How does GPU memory work?
Objectives
To send data from CPU to GPU and back
In this section, we will write some code that will have the GPU add two numbers. Trivial, right? Not as trivial as you might think, because a GPU card has completely separate memory from the CPU. Things stored in one are not accessible from the other, they have to be copied back and forth.
So to add two numbers on the GPU that start on our keyboard, we need to first store them in the CPU (or “host”) memory, then move them from there to the GPU (or “device”) memory, and finally move the result back from the device memory to the host memory.
This language will come up again and again in CUDA: The CPU and its associated memory is the host, while the GPU and its associated memory is the device.
Here’s a kernel function that will do the addition on the GPU:
__global__ void add(int *da, int *db, int *dc) {
   *dc = *da + *db;
}
Those asterisks may be unfamiliar to you if you haven’t done much C
programming. They mean that the parameters being supplied are not the
integers to be added, but instead pointers to where those integers
are in memory. This is because the kernel function is called from
the host CPU, but executes on the GPU and hence needs to point to
memory locations within the GPU memory. The line *dc = *da + *db says
“take the values at addresses da and db, add them together, and
store the result at the address dc.” So da, db and dc are locations
in memory, and *da, *db and *dc are the values stored at those locations.
I’ve prefixed all the names with “d” for “device” to remind us that they’re
locations in the GPU memory.
We’ll also need to determine the address (that is, the storage location)
of a few variables. The C operator to do that is the ampersand, &.
&x returns the address of x, which is to say, a pointer to x.
Memory Allocation
In C programs, there are two ways that memory for data can be allocated. The first is define it statically when a variable is declared.
int a;…declares an integer
aand the space to hold it.The second way is to allocate it dynamically and keep a pointer to that area of memory.
int *a;
a = (int *)malloc(sizeof(int));
…declares a pointer to an integer, and then
mallocfinds space to put it and we put theaddressof that space intoa. This is what is almost always done for data arrays, since it allows you to choose the size of the array at run time rather than compile time.If you use
malloc()or any of its cousins to allocate memory, you are responsible for giving it back again when you are done with thefree()function.free(a);
There are CUDA variants for malloc and free that handle allocation of
memory on the GPU. These functions deal with pointers to pointers(!), so it
looks like the following:
int *d_a;
cudaMalloc((void **)&d_a, sizeof(int));
You then need to copy data from the CPU memory to the GPU memory with another function from the CUDA library. This looks like:
cudaMemcpy(d_a, &a, sizeof(int), cudaMemcpyHostToDevice);
The order of arguments here is
- destination address,
- source address,
- number of bytes, and
- cudaMemcpyKind.
That last is a symbolic constant defined by the CUDA library:
Either cudaMemcpyHostToDevice or cudaMemcpyDeviceToHost.
To copy results back to the host memory you use the same function, with
the destination and source addresses in the correct order and the correct
constant in the last position.
Here’s web documentation for:
Exercise: Complete the code
Using the template below and the bits and pieces just shown, build and test the code to have the GPU card to add two integers.
You’ll need these pieces:
- The kernel function
add()at the top of this page- Patterns for
cudaMalloc()andcudaMemcpy()
- You’ll need to allocate GPU memory for two inputs and one output
- Call the kernel function with
add<<<1,1>>>(...)- Print the result with
printf("%d plus %d equals %d\n", a, b, c);- Release the allocated GPU memory with
cudaFree()/* TEMPLATE CODE */ #include <stdio.h> #include <stdlib.h> // ... define function 'add' ... int main(int argc, char **argv) { int a, b, c; // We've chosen static allocation here for host storage.. int *d_a, *d_b, *d_c; // ...but device storage must be dynamically allocated a = atoi(argv[1]); // Read the addends from the command line args b = atoi(argv[2]); // ... manage memory ... // ... move data ... add<<<1,1>>>(d_a, d_b, d_c); // call kernel function on GPU // ... move data ... printf("%d + %d -> %d\n", a, b, c); // ... manage memory ... }Solution
#include <stdio.h>
#include <stdlib.h>

__global__ void add(int *da, int *db, int *dc) {
   *dc = *da + *db;
}

int main(int argc, char **argv) {
  int a, b, c;        // We've chosen static allocation here for host storage..
  int *d_a, *d_b, *d_c;  // ...but device storage must be dynamically allocated
  a = atoi(argv[1]);  // Read the addends from the command line args
  b = atoi(argv[2]);

  cudaMalloc((void **)&d_a, sizeof(int));
  cudaMalloc((void **)&d_b, sizeof(int));
  cudaMalloc((void **)&d_c, sizeof(int));
  cudaMemcpy(d_a, &a, sizeof(int), cudaMemcpyHostToDevice);
  cudaMemcpy(d_b, &b, sizeof(int), cudaMemcpyHostToDevice);

  add<<<1,1>>>(d_a, d_b, d_c);
  cudaMemcpy(&c, d_c, sizeof(int), cudaMemcpyDeviceToHost);

  printf("%d + %d -> %d\n", a, b, c);
  cudaFree(d_a); cudaFree(d_b); cudaFree(d_c);
}
Compile with
nvcc add.cu -o add, test withsrun --gres=gpu:1 add 1 2
Oh, and one more thing: We should add cudaDeviceSynchronize() just before we
copy back the result. The CPU code is not required to wait for the GPU code to
complete before it continues. This call will force it to wait. This is another
one of those errors that will probably not occur until long after you’ve
stopped expecting it, and then when it does, you’ll have no clue what’s going
on.
Result is zero?
If you get:
$ srun --gres=gpu:1 ./add 1 21 + 2 -> 0…you may have forgotten to load the CUDA module
module load cuda/11.4.
We still haven’t done anything in parallel. That’s next.
Key Points
The CPU (the ‘host’) and the GPU (the ‘device’) have separate memory banks
This requires explicit copying of data to and from the GPU
Adding vectors with GPU threads
Overview
Teaching: 15 min
Exercises: 10 minQuestions
How can we parallelize code on a GPU?
Objectives
Use CUDA threads
A GPU is not meant for doing one thing at a time; it’s meant for doing arithmetic on massive amounts of data all at the same time. It’s time we scaled up what we’re doing.
Let’s generalize the code we just wrote to add two vectors of integers,
instead of two integers. Instead of having statically defined variables to hold
single integers in the host (CPU) memory, we’ll declare pointers to integers
and then call malloc to create space for the vectors:
int *a;
int bytes = N * sizeof(int);
a = (int *)malloc(bytes);
Because of the relation between pointers and arrays in C, we can store and
retrieve data from an allocated block of memory using array syntax,
expressions like a[i].
We’ll set the number of GPU threads to something larger than one by changing
the second argument in the <<<M,N>>> when we call the kernel function. Back
in Episode 2 we mentioned that the first number, M, is the block count and
the second, N, is the thread count. For the moment let’s use 512 threads,
leave the block count at 1, and we’ll come back and discuss those numbers
later.
We also need to change the kernel function to match. The CUDA library provides
several variables for indexing. We’ll talk more about those later too, but for
now use threadIdx.x. Change the kernel function definition to the following:
__global__ void add(int *da, int *db, int *dc) {
   dc[threadIdx.x] = da[threadIdx.x] + db[threadIdx.x];
}
Notice that this kernel function just adds one pair of integers and stores
them in one matching location in array dc. But because we’ve used the
CUDA-provided index variable, each thread will execute that kernel function on
the thread’s own little piece of the data. In other words, the kernel
function gets called potentially thousands of times in parallel— which is why
there’s no loop in it. The looping is implicit in the <<<M,N>>> decorator
when we call the kernel.
Exercise: From single integers to vectors
Combine your code from the previous exercise and the pieces described above to add two vectors on the GPU. You can just print the first and last results. While it might be more realistic to populate the input vectors with random numbers or something, for simplicity you can just populate each one with
Ncopies of the same number.If you’re not accustomed to C programming or confused by
malloc, double up with another student who is familiar with C. They’ll help you.Solution
#include <stdio.h>
#include <stdlib.h>

__global__ void add(int *da, int *db, int *dc) {
   dc[threadIdx.x] = da[threadIdx.x] + db[threadIdx.x];
}

int main(int argc, char **argv) {
   int a_in = atoi(argv[1]);  // first addend
   int b_in = atoi(argv[2]);  // second addend
   int N = atoi(argv[3]);     // length of arrays

   int numThreads = 512;
   int *a, *b, *c;
   int *d_a, *d_b, *d_c;
   int size = N * sizeof(int);

   a = (int *)malloc(size);
   b = (int *)malloc(size);
   c = (int *)malloc(size);

   // Initialize the input vectors
   for (int i=0; i<N; ++i) {
      a[i] = a_in; b[i] = b_in; c[i] = 0; }

   cudaMalloc((void **)&d_a, size);
   cudaMalloc((void **)&d_b, size);
   cudaMalloc((void **)&d_c, size);
   cudaMemcpy(d_a, a, size, cudaMemcpyHostToDevice);
   cudaMemcpy(d_b, b, size, cudaMemcpyHostToDevice);

   add<<<1,numThreads>>>(d_a, d_b, d_c);
   cudaDeviceSynchronize();

   cudaMemcpy(c, d_c, size, cudaMemcpyDeviceToHost);
   cudaFree(d_a); cudaFree(d_b); cudaFree(d_c);

   printf("%d + %d = %d\n", a[0],   b[0],   c[0]);
   printf("...\n");
   printf("%d + %d = %d\n", a[N-1], b[N-1], c[N-1]);
   free(a); free(b); free(c);
}
Don’t forget: To get to a GPU you may need to do something like
srun --gres=gpu:1 addvec 1 2 512.
Bonus exercise: (Move fast and) Break things
Once you’ve got the code working on 512 elements, vary the number of elements and see what happens. Do you have any idea why it does that?
For even more fun, vary the number of threads.
Key Points
Threads are the lowest level of parallelization on a GPU
A kernel function replaces the code inside the loop to be parallelized
The CUDA
<<<M,N>>>notation replaces the loop itself
Using blocks instead of threads
Overview
Teaching: 10 min
Exercises: 20 minQuestions
What is the difference between blocks and threads?
Is one faster than the other?
Objectives
To use blocks to parallelize work
Examine CUDA performance
In the Hello World example we saw the <<<M,N>>> syntax used in CUDA to call a
kernel function, and we told you that it creates M blocks and N threads per
block. In the Adding Vectors example we just finished, we created threads with
<<<1,N>>>. Now we will use the first parameter to create blocks instead.
What’s a block? A GPU typically has several streaming multiprocessors (SMs). A block is handled by one SM, and each SM may handle many blocks in succession. Each SM supports up to 1024 threads, typically in multiples of 32 called “warps”. Threads can quickly access and share the data within a block. The pictures below from CUDA C Programming Guide should help:
| Blocks and SMs | Thread Blocks |
|---|---|
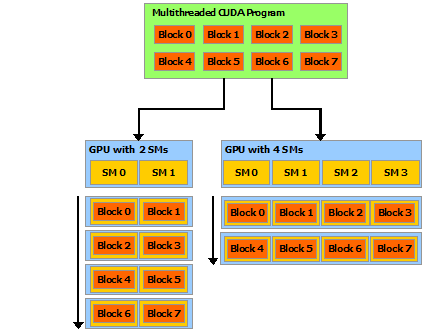 |
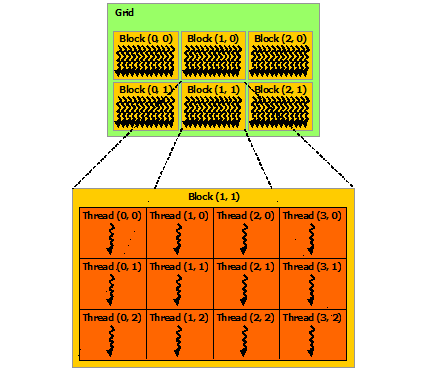 |
The P100 GPU model available at Graham Cedar has 56 SMs, each supporting 64 single-precision threads or 32 double-precision threads. So if you are doing double-precision calculations, each GPU has effectively 56*32 = 1792 cores. At Béluga there are newer V100 GPUs with 80 SMs, which again support 64 single-precision or 32 double-precision threads each, for 2560 effective cores.
But to take advantage of all these “CUDA cores” you need to use both blocks and threads.
We’ll start by doing something a little silly, and just switch from threads to
blocks. Change the kernel function to use CUDA’s block index,
blockIdx.x, like so:
__global__ void add(int *a, int *b, int *c) {
   c[blockIdx.x] = a[blockIdx.x] + b[blockIdx.x];
}
Exercise: Change threads to blocks
Copy the Adding Vectors example you just finished, and change the copy to use blocks instead of threads. Verify that it still produces correct results.
Solution
#include <stdio.h>
#include <stdlib.h>

__global__ void add(int *da, int *db, int *dc) {
   dc[blockIdx.x] = da[blockIdx.x] + db[blockIdx.x];
}

int main(int argc, char **argv) {
   int a_in = atoi(argv[1]);  // first addend
   int b_in = atoi(argv[2]);  // second addend
   int N = atoi(argv[3]);     // length of arrays
   int numBlocks = 512;

   int *a, *b, *c;
   int *d_a, *d_b, *d_c;
   int size = N * sizeof(int);
   a = (int *)malloc(size);
   b = (int *)malloc(size);
   c = (int *)malloc(size);

   // Initialize the input vectors
   for (int i=0; i<N; ++i) {
      a[i] = a_in; b[i] = b_in; c[i] = 0; }

   cudaMalloc((void **)&d_a, size);
   cudaMalloc((void **)&d_b, size);
   cudaMalloc((void **)&d_c, size);
   cudaMemcpy(d_a, a, size, cudaMemcpyHostToDevice);
   cudaMemcpy(d_b, b, size, cudaMemcpyHostToDevice);

   add<<<numBlocks,1>>>(d_a, d_b, d_c);
   cudaDeviceSynchronize();
   cudaMemcpy(c, d_c, size, cudaMemcpyDeviceToHost);
   cudaFree(d_a); cudaFree(d_b); cudaFree(d_c);

   printf("%d + %d = %d\n", a[0],   b[0],   c[0]);
   printf("...\n");
   printf("%d + %d = %d\n", a[N-1], b[N-1], c[N-1]);
   free(a); free(b); free(c);
}
Measuring speed
The point of using a GPU is speed, so how do we measure the speed of
our kernel code and the various CUDA calls like cudaMemcpy? CUDA
provides the utility nvprof for this. Here’s some sample output:
$ nvprof ./addvec_blocks 1 2 512
==6473== NVPROF is profiling process 6473, command: ./addvec_blocks
==6473== Profiling application: ./addvec_blocks
1 + 2 = 3
 ...
1 + 2 = 3
==6473== Profiling result:
            Type  Time(%)      Time     Calls       Avg       Min       Max  Name
 GPU activities:   39.36%  3.1360us         2  1.5680us  1.3440us  1.7920us  [CUDA memcpy HtoD]
                   38.96%  3.1040us         1  3.1040us  3.1040us  3.1040us  add(int*, int*, int*)
                   21.69%  1.7280us         1  1.7280us  1.7280us  1.7280us  [CUDA memcpy DtoH]
      API calls:   99.20%  191.29ms         3  63.765ms  9.4530us  191.27ms  cudaMalloc
                    0.35%  681.62us         1  681.62us  681.62us  681.62us  cuDeviceTotalMem
                    0.21%  413.84us        96  4.3100us     108ns  167.14us  cuDeviceGetAttribute
                    0.08%  158.83us         3  52.942us  4.9910us  139.28us  cudaFree
                    0.07%  136.64us         1  136.64us  136.64us  136.64us  cudaLaunchKernel
                    0.05%  90.485us         3  30.161us  14.610us  58.564us  cudaMemcpy
                    0.03%  52.872us         1  52.872us  52.872us  52.872us  cuDeviceGetName
                    0.01%  11.735us         1  11.735us  11.735us  11.735us  cudaDeviceSynchronize
                    0.00%  3.5890us         1  3.5890us  3.5890us  3.5890us  cuDeviceGetPCIBusId
                    0.00%  1.4540us         3     484ns     120ns     923ns  cuDeviceGetCount
                    0.00%     651ns         2     325ns     189ns     462ns  cuDeviceGet
                    0.00%     204ns         1     204ns     204ns     204ns  cuDeviceGetUuid
This tells us the GPU spent 3.1040 microseconds in our add() kernel,
but spent slightly longer (3.1360us) just copying the data from the
host to the device, and then half that again copying the results back.
You might also note that, among the “API calls”, cudaMalloc takes 99%
of the time!
This should drive home what we meant when we said the GPU is for arithmetically intense operations. All the examples we’ve done in this workshop are too small. They could have been done just as quickly and even more simply on the CPU— but that is often the nature of example problems!
Getting your data on to and off of the GPU is the price you pay to access the massive parallelism of the GPU. To make that worth while, you have to need to do a lot of arithmetic! And your program should be designed in such a way that data movement between main memory and GPU is minimized. Ideally the data moves onto the GPU once, and moves off once.
Nonetheless, as long as you bear in mind which parts of these problems are
artificial, you can still use nvprof to answer some interesting questions, like,
“Is it faster to use threads or blocks?”
Speed trial: Threads versus blocks
Compare the performance of the
add()kernel in the two codes you just produced. Which is faster, using threads or using blocks? How much faster?What happens if you vary the size of the array? Make sure you still get correct answers!
Key Points
Use
nvprofto profile CUDA functionsBlocks are the batches in which a GPU handles data
Blocks are handled by streaming multiprocessors (SMs)
Each block can have up to 1024 threads (on our current GPU cards)
Putting It All Together
Overview
Teaching: 10 min
Exercises: 20 minQuestions
How do blocks and threads work together?
What other GPU programming resources are there?
Objectives
To show how blocks and threads typically work together
To take advantage of all these “CUDA cores” you need to use both blocks and threads.
The family of CUDA variables defining blocks and threads can be explained by referring to this image from “An Even Easier Introduction to CUDA”:
int blockSize = 256;
int numBlocks = (N + blockSize - 1) / blockSize;
add<<<numBlocks, blockSize>>>(N, x, y);

The number of blocks is in gridDim.x— we’ve been calling that numBlocks
in our CPU-side code— and the number of threads in a block is blockDim.x
which we’ve been calling numThreads. CUDA also provides the index of the
current block in blockIdx.x and the thread index within that block is
threadIdx.x, both of which we saw earlier.
All the indexing is zero-based, like in C.
If you’re wondering about the .x on all of these, it’s there because
you have the option of specifying 2- or 3-dimensional arrays of blocks, and
threads within blocks, for natural indexing of 2- and 3-dimensional data
structures likes matrices or volumes. See the
CUDA Programming Guide
if you want to learn more about this.
We’ll change our kernel function one more time, to escape the limitation of the thread count and get (we hope) maximal performance. We’ll also put a loop back in, in case the size of our data is greater than the number of (blocks times threads) we have:
__global__ void add(int n, int *a, int *b, int *c) {
   int index = blockIdx.x * blockDim.x + threadIdx.x;
   int stride = blockDim.x * gridDim.x;
   for (int i = index; i < n; i += stride)
      c[i] = a[i] + b[i];
}
Now the size of dataset (i.e. the length of the vectors) we can handle correctly no longer depends on the number of blocks and threads.
We still need to choose a number of blocks and a thread count.
We’ve seen that threads-per-block can’t go higher than 1024, and 256 is a
fairly conventional choice. We could choose a number of blocks that exactly
covers the size of our arrays by dividing N / numthreads, and adding an extra
block to handle any remainder from the division. But by introducing a loop
into the kernel we just wrote, it should be able to handle any choice of block
and thread count that we give it. So now we’re free to play with numBlocks
and numThreads all we like, checking performance with nvprof to see how
much difference various choices make.
Putting it all together
Introduce the
add()kernel above into your code from the previous episodes, and adjust the rest of the program to make it work.
- Verify that it still produces correct results.
- Use
nvprofto compare the performance to that of the two previous solutions.Solution
Here’s a version of the code that includes a few more “bells and whistles”. Most importantly, you need to specify the addends, the size of the arrays, and the number of threads and blocks. This makes it easier to explore the correctness and performance of these choices.
#include <stdio.h>
#include <stdlib.h>

__global__ void add(int N, int *da, int *db, int *dc) {
   // This is a CUDA idiom called the grid-stride loop.
   int index = blockIdx.x * blockDim.x + threadIdx.x;
   int stride = blockDim.x * gridDim.x;
   for (int i = index; i < N; i += stride)
      dc[i] = da[i] + db[i];
}

int main(int argc, char **argv) {
   // Read values from cmd line.
   if (argc < 6) {
      printf("Usage:\n %s a b N threads blocks\n", argv[0]);
      return(-1);
   }
   int a_in = atoi(argv[1]);
   int b_in = atoi(argv[2]);
   int N = atoi(argv[3]);
   int numThreads = atoi(argv[4]);
   int numBlocks = atoi(argv[5]);
   // Or to get the block count that covers N elements:
   // int numBlocks = (N + numThreads - 1) / numThreads;

   // Calculate size of arrays in bytes.
   int size = N * sizeof(int);
   // Allocate host storage.
   int *a, *b, *c;
   a = (int *)malloc(size);
   b = (int *)malloc(size);
   c = (int *)malloc(size);
   // Initialize the input vectors.
   for (int i=0; i<N; ++i) {
      a[i] = a_in;
      b[i] = b_in;
      c[i] = 0;
   }

   // Allocate device storage.
   int *da, *db, *dc;
   cudaMalloc((void **)&da, size);
   cudaMalloc((void **)&db, size);
   cudaMalloc((void **)&dc, size);

   // Copy data to GPU.
   cudaMemcpy(da, a, size, cudaMemcpyHostToDevice);
   cudaMemcpy(db, b, size, cudaMemcpyHostToDevice);

   // Execute the kernel on the GPU.
   add<<<numBlocks,numThreads>>>(N, da, db, dc);
   cudaDeviceSynchronize();

   // Copy results back from GPU.
   cudaMemcpy(c, dc, size, cudaMemcpyDeviceToHost);

   // Print results from each end of the array.
   printf("%d plus %d equals %d\n", a[0], b[0], c[0]);
   printf(" ...\n");
   printf("%d plus %d equals %d\n", a[N-1], b[N-1], c[N-1]);

   // Check for stray errors somewhere in the middle.
   // We won't check them all, quit after first error.
   int expected = a_in + b_in;
   for (int i=0; i<N; ++i) {
      if (c[i] != expected) {
         printf("Wrong sum %d at element %d!\n", c[i], i);
         break;
      }
   }

   // Free all allocated memory.
   cudaFree(da); cudaFree(db); cudaFree(dc);
   free(a); free(b); free(c);
}
Compile it and invoke it like this:
$ nvcc addvec_final.cu -o final
$ srun --gres=gpu:1 final 2 2 10000 256 80
Remember, you can also use
sallocin place ofsrunto get a shell prompt on a GPU node so you can more easily run multiple trials, and usingnvprof final ...will give you performance information. (Except on our virtual cluster. Sorry!)
Other bits and pieces
You can define shared variables in your kernel functions that are visible to all running threads in a block. Maybe you want to have a flag to record whether some unusual condition arose while processing a block of data?
__global__ void add(int *a, int *b, int *c) {
   __shared__ int block_status;
   c[threadIdx.x] = a[threadIdx.x] + b[threadIdx.x];
}
You can also synchronize the execution of code by setting barriers to get threads to reach common points in the problem. Let’s say that you are evolving some system and need all of the threads to finish their work before going onto the next step. This is where synchronization comes into play.
# Do the current time step
__syncthreads();
# Go on to do the next time step
This helps avoid problems like race conditions, where incorrect data is being used in your calculation. GPU programming is basically a type of shared-memory programming, so the same problems and cautions we saw with OpenMP apply here.
Key Points
A typical kernel indexes data using both blocks and threads
GPU Hardware Architecture
Overview
Teaching: 10 min
Exercises: 5 minQuestions
What are the capabilities of the GPU that I’m using?
Objectives
Compile and run CUDA device diagnostics.
A Closer Look at GPU Hardware Architecture
The GV100 is the GPU chip that the Tesla V100 data centre card is based on.
Nvidia GV100 Block Diagram
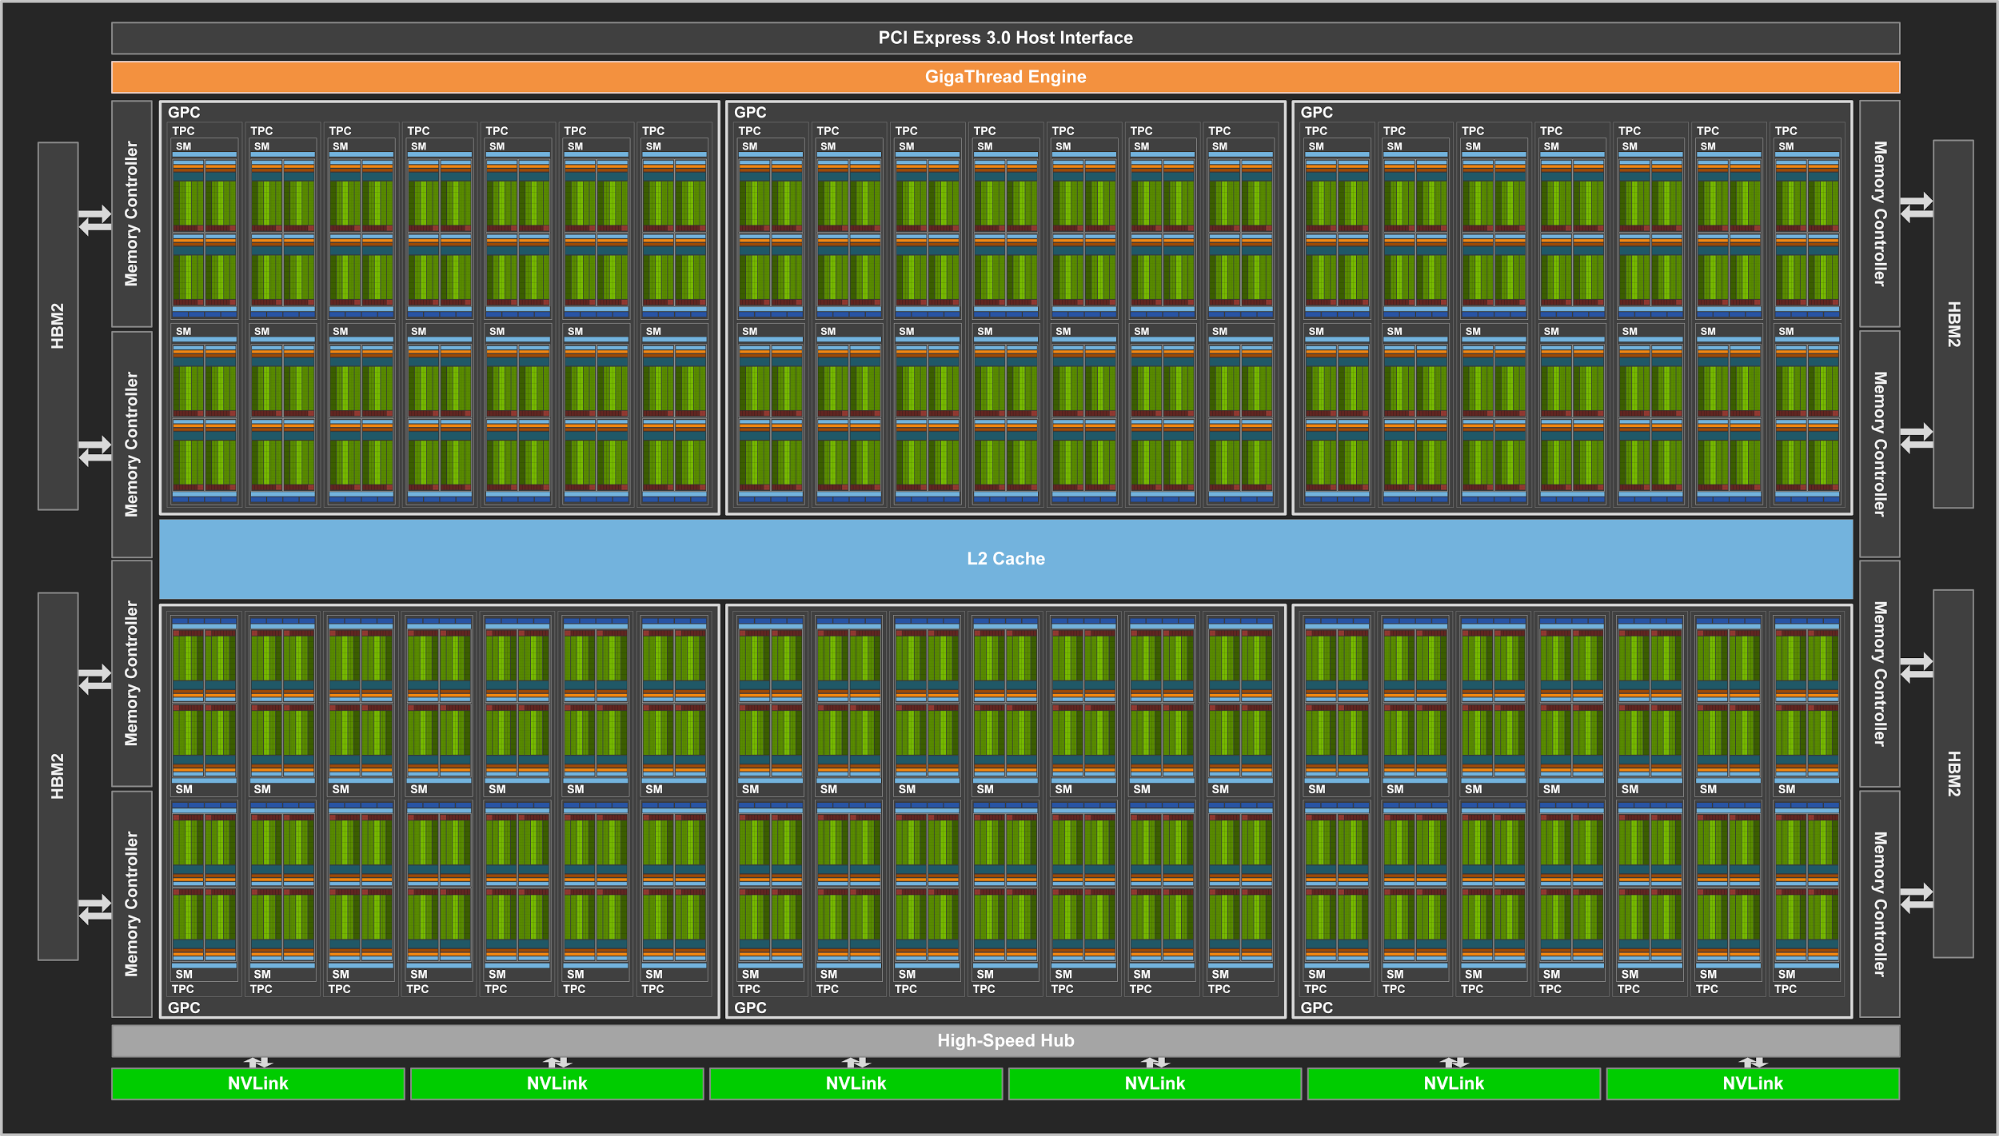
This model of GPUs consists of:
| Graphics Processing Clusters (GPCs) | 6 | |
| Streaming Multi-Processors (SMs) | 84 | (14 per GPC) |
| L1 Cache (per SM) | 128 KB | |
| L2 Cache | 6144 KB |
Nvidia GV100 SM (Streaming Multi-Processor)
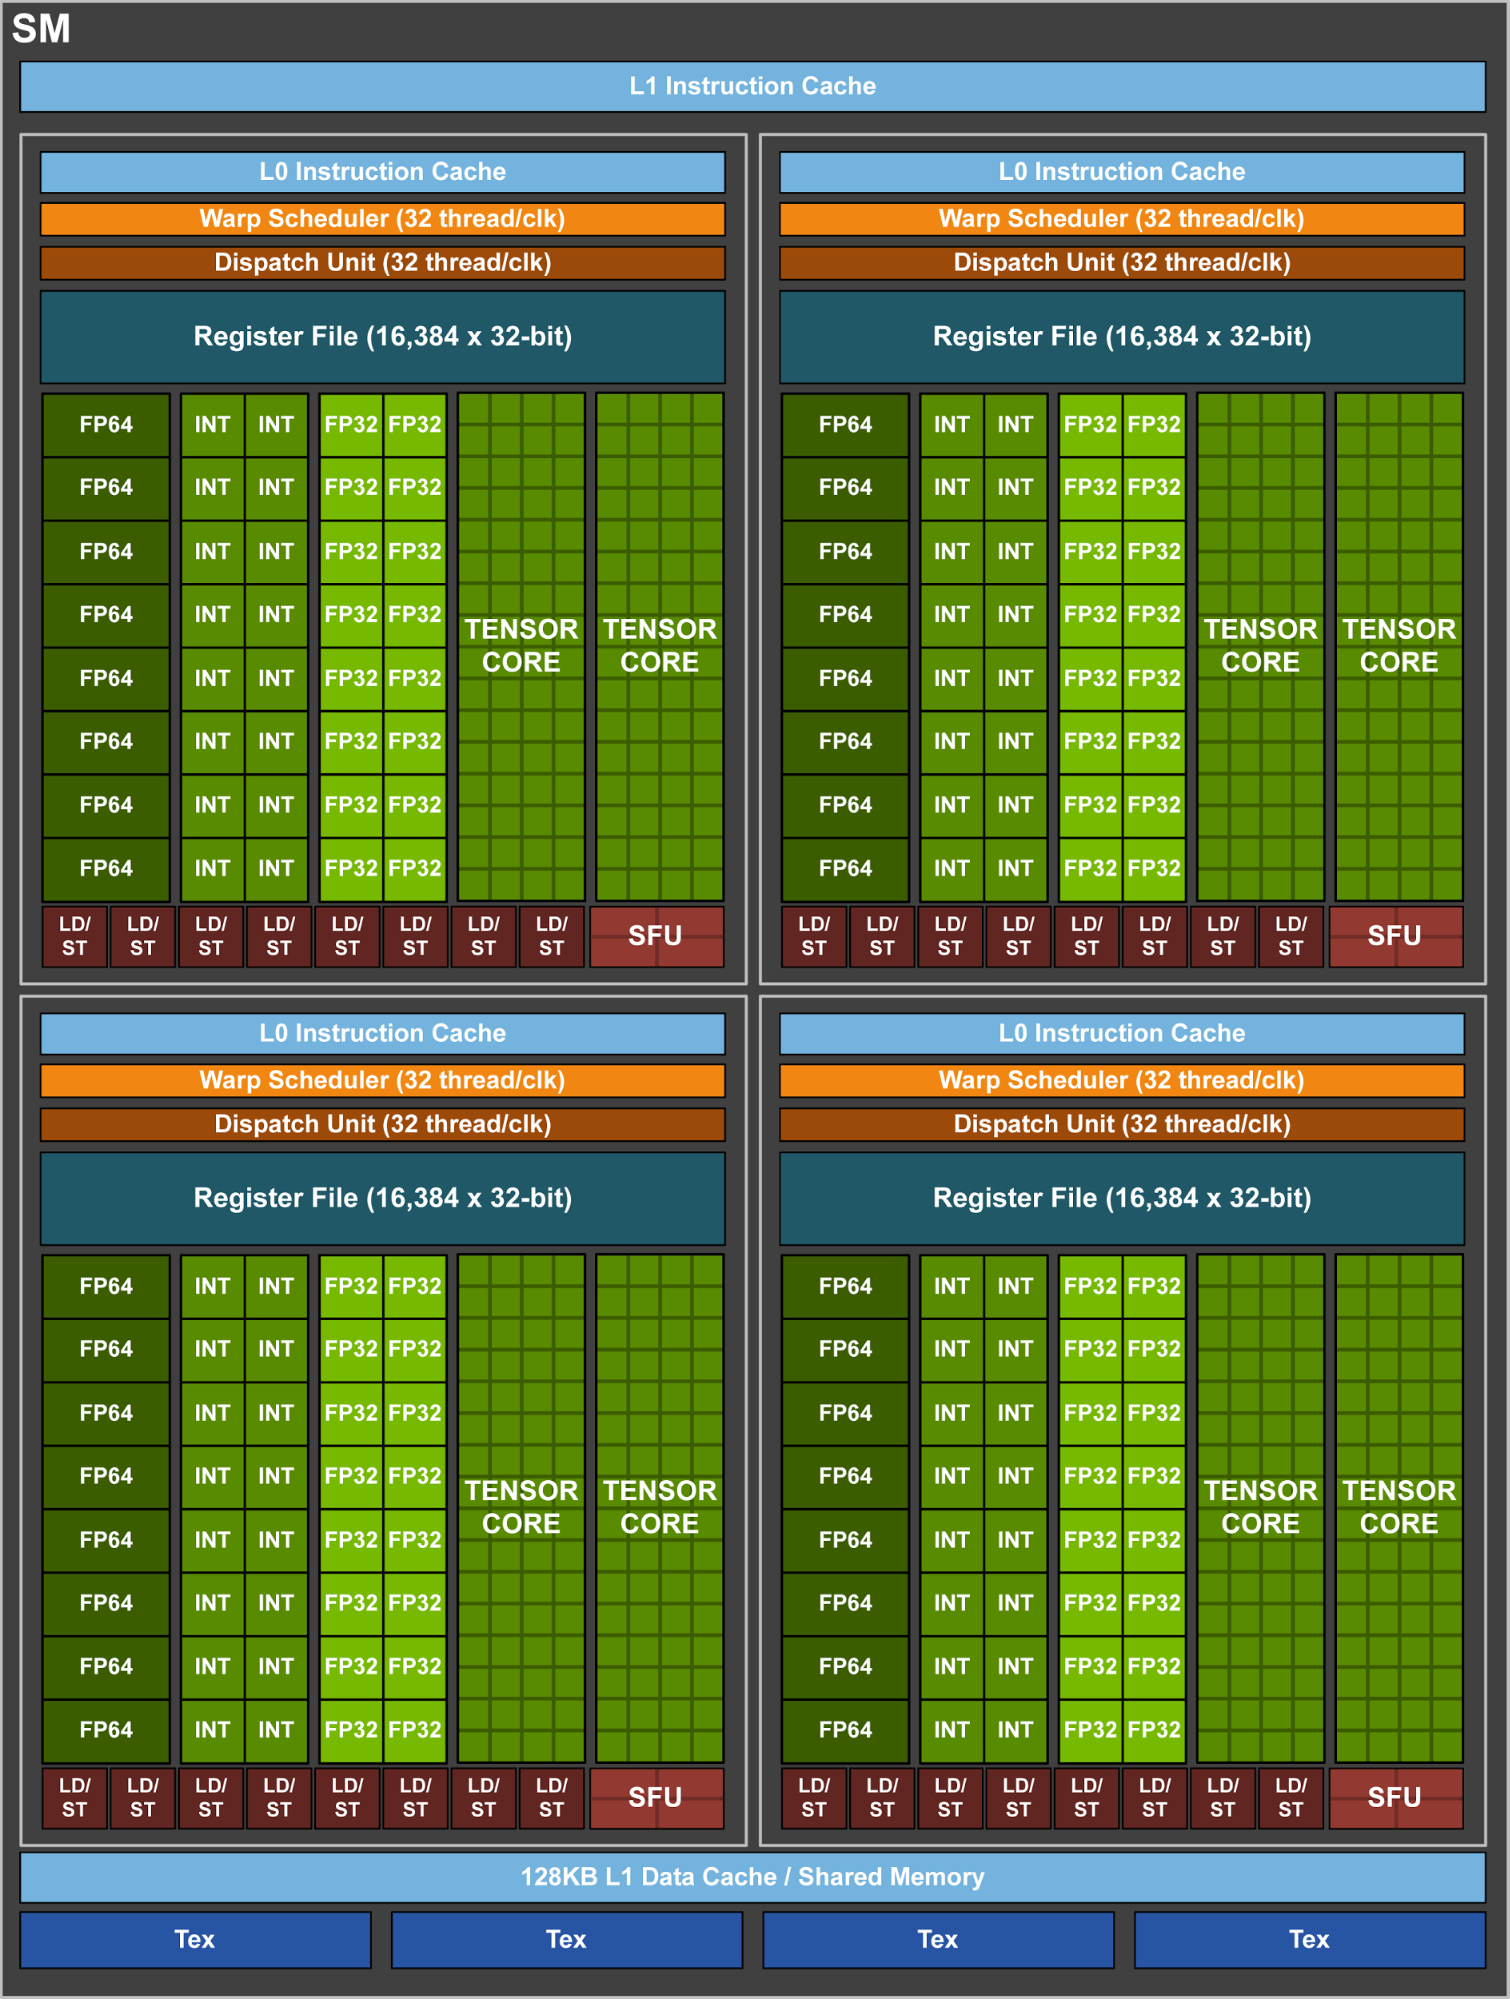
| Type | per SM | total |
|---|---|---|
| 32 bit integer (INT32) Cores | 64 | 5376 |
| single precision floating point (FP32) Cores | 64 | 5376 |
| double precision floating point (FP64) Cores | 32 | 2688 |
| Tensor Cores (work on matrices instead of vectors) | 8 | 672 |
Running device diagnostics
Let’s run some device diagnostics on a V100 GPU to print out some of its properties:
Device diagnostic code
device_diagnostic.cuThis is the code for
device_diagnostic.cuthat can also be downloaded from: https://raw.githubusercontent.com/acenet-arc/ACENET_Summer_School_GPGPU/gh-pages/code/07-architecture/device_diagnostic.cu/* compile with module load cuda nvcc device_diagnostic.cu -o device_diagnostic */ #include <cstdio> int main( void ) { cudaDeviceProp prop; int count; cudaGetDeviceCount( &count); printf("found %d CUDA devices\n",count); for (int i=0; i< count; i++) { cudaGetDeviceProperties( &prop, i ); printf( " --- General Information for device %d ---\n", i ); printf( "Name: %s\n", prop.name ); printf( "Compute capability: %d.%d\n", prop.major, prop.minor ); printf( "Clock rate: %d\n", prop.clockRate ); printf( "Device copy overlap: " ); if (prop.deviceOverlap) printf( "Enabled\n" ); else printf( "Disabled\n"); printf( "Kernel execution timeout: " ); if (prop.kernelExecTimeoutEnabled) printf( "Enabled\n" ); else printf( "Disabled\n" ); printf( " --- Memory Information for device %d ---\n", i ); printf( "Total global mem: %ld\n", prop.totalGlobalMem ); printf( "Total constant Mem: %ld\n", prop.totalConstMem ); printf( "Max mem pitch: %ld\n", prop.memPitch ); printf( "Texture Alignment: %ld\n", prop.textureAlignment ); printf( " --- MP Information for device %d ---\n", i ); printf( "Multiprocessor count: %d\n", prop.multiProcessorCount ); printf( "Shared mem per mp: %ld\n", prop.sharedMemPerBlock ); printf( "Registers per mp: %d\n", prop.regsPerBlock ); printf( "Threads in warp: %d\n", prop.warpSize ); printf( "Max threads per block: %d\n", prop.maxThreadsPerBlock ); printf( "Max thread dimensions: (%d, %d, %d)\n", prop.maxThreadsDim[0], prop.maxThreadsDim[1], prop.maxThreadsDim[2] ); printf( "Max grid dimensions: (%d, %d, %d)\n", prop.maxGridSize[0], prop.maxGridSize[1], prop.maxGridSize[2] ); printf( "\n" ); } }
$ cd ~/scratch
$ mkdir diagnostics
$ cd diagnostics
$ wget https://raw.githubusercontent.com/acenet-arc/ACENET_Summer_School_GPGPU/gh-pages/code/07-architecture/device_diagnostic.cu
$ nvcc device_diagnostic.cu  -o device_diagnostic
$ srun --time=5 --gres=gpu:1  ./device_diagnostic
$ srun --time=5 --gres=gpu:1  ./device_diagnostic
found 1 CUDA devices
   --- General Information for device 0 ---
Name:                     Tesla V100-PCIE-32GB
Compute capability:       7.0
Clock rate:               1380000
Device copy overlap:      Enabled
Kernel execution timeout: Disabled
   --- Memory Information for device 0 ---
Total global mem:         34079637504
Total constant Mem:       65536
Max mem pitch:            2147483647
Texture Alignment:        512
   --- MP Information for device 0 ---
Multiprocessor count:     80
Shared mem per mp:        49152
Registers per mp:         65536
Threads in warp:          32
Max threads per block:    1024
Max thread dimensions:    (1024, 1024, 64)
Max grid dimensions:      (2147483647, 65535, 65535)
Compute Capability
The Compute capability is represented by a version number (sometimes called the “SM version”), that
identifies the features supported by the GPU chip can can be used by the software.
By default nvcc will compile the code for all supported architectures. However if you know which
generation of GPUs your code will be running on, you can restrict the compiler to target only
one or a specific list of architectures.
For example, you can use nvcc --arch=compute_70 ... to compile only for compute capability 7.0,
which will only run on those GPUs supporting at least this version.
$ nvcc --arch=compute_70 mycode.cu
More information on compute capability can be found:
- In the CUDA C Programming Guide which lists the various features and the version in which they are available.
- The following page lists all different models of Nvidia GPUs with their Compute capability version: https://developer.nvidia.com/cuda-gpus
Multiprocessor Count
The V100 card reports having 80 Multiprocessors (SMs). But if the V100 is based on the GV100 chip that is supposed to have 84 SMs. Where are the remaining 4 SMs?
The answer to that lies in the practicalities of manufacturing. The GV100 chip consists of more than 20 billion transistors that are produced in a “12 nm” process. With so many elements being produced with such fine details, it is extremely difficult to get a chip that has no defects. During production, each all SMs of each individual chip are tested and SMs with defects are disabled.
For the V100 cards, Nvidia is using chips with 4 disabled SMs, some of which likely have defects. Chips that need to have more defective SMs disabled can still be used for lower tier products.
Overall this is done to increase the yield of usable chips during manufacturing. Comparable strategies are used by other chip-manufacturers as well.
Shared Memory per Multiprocessor
Shared Memory is a special kind of memory within each multiprocessor, that is much faster than global (GPU) memory. It can be used to store a block of data that the current threads need to be working on directly in the multiprocessor, reducing wait-times due to inefficient reads from global memory. The downside is, that shared memory needs to be managed manually.
Threads in warp (Warp Size)
As mentioned in the episode Using blocks in stead of threads, each Multiprocessor creates, manages and executes threads in groups of 32 parallel threads called warps. All threads of a warp always have consecutive thread-IDs and always start together.
A warp always executes one common instruction at a time. This means that best efficiency is achieved when all threads in a warp follow the same code-path. When some threads branch off to a different code-path than the rest, for example at an if-else clause, the multi-processor first continues with those threads that follow one path, temporarily disabling the others and going back to finish them later.
This is an important behaviour of SIMT (Single-Instruction, Multiple-Thread) architecture.
Maximum Number of Threads per Block
This is the maximum number of threads that can be used in a single block, i.e.
the blockSize in this example:
my_kernel<<<numBlocks, blockSize>>>(...);
This maximum block size has been at 1024 for compute capability >= 2.0. Though Nvidia may decide to increase the limit sometime in the future.
Maximum Thread Dimensions
So far we have only used a single dimension for threads (threadIdx.x), however
CUDA also allows us to index our threads using three dimensions: threadIdx.x,
threadIdx.y and threadIdx.z.
What Max thread dimensions: (1024, 1024, 64) tells us the maximum dimensions in x, y and z,
however the product of these may never exceed the maximum number of threads.
This means that with Max threads per block: 1024 and Max thread dimensions: (1024, 1024, 64),
we could (among others) use the following block configurations:
- 1024 x 1 x 1 = 1024
- 1 x 1024 x 1 = 1024
- 256 x 2 x 2 = 1024
- 4 x 4 x 64 = 1024
- 16 x 8 x 8 = 1024
Key Points
Compute capability is a version number that represents the features supported by a GPU.
Shared memory is a small, but fast memory available for each multiprocessor that needs to be managed manually.
Since compute capability 2, each block can consist of up to 1024 threads, which can further be organized in up to three dimensions.
Active threads within a warp can only ever execute the same instructions at the same time. If some threads branch, they will be set aside for later.
Thread Addressing
Overview
Teaching: 10 min
Exercises: 0 minQuestions
How can I address multidimensional data structures more intuitively?
Objectives
Use 2D and 3D Grids and Blocks.
So far we have used the grid-stride loop to process one-dimensional vector data on the GPU. This is quite easy for e.g. adding or multiplying two vectors.
We’ve used this by launching our Kernel with:
myKernel<<<numBlocks, blockSize>>>(paramlist);
Where both numBlocks and blockSize are integers and we use the variables blockDim.x, blockIdx.x and threadIdx.x inside the kernel to calculate our position in the vector.
However this can get cumbersome if the data that I’m trying to process has more dimensions, like matrices or tensors.
But luckily CUDA allows for blocks and grids to have more than one dimension by using the more general notation:
myKernel<<<GridDef, BlockDef>>>(paramlist);
Where GridDef and BlockDef are data structures of type dim3 instead of int, each of which can be 1-, 2- or 3-Dimensional.
1D Addressing Example: 100 blocks with 256 threads per block:
With this notation, we can still create 1D-indices:
dim3 gridDef1(100,1,1);
dim3 blockDef1(256,1,1);
myKernel<<<gridDef1, blockDef1>>>(paramlist);
which is equivalent to:
myKernel<<<100, 256>>>(paramlist);
This will create \(100 \cdot 256 = 25600\) threads in total.
2D Addressing Example: 10x10 blocks with 16x16 threads per block:
With this notation, we can still create 1D-indices:
dim3 gridDef2(10,10,1);
dim3 blockDef2(16,16,1);
myKernel<<<gridDef2, blockDef2>>>(paramlist);
Like the previous example this will create \(10 \cdot 10 = 100\) blocks
and \(16 \cdot 16 = 256\) threads per block, but instead of just using the variables
blockDim.x, blockIdx.x, and threadIdx.x, it uses blockDim.x, blockDim.y, blockIdx.x, blockIdx.y, threadIdx.x, and threadIdx.y.
In the 2D case, we can now calculate indices x and y to access datapoints
in a 2D matrix:
__global__ void kernel2(float *idata, float *odata)
{
    int x, y;
    x = blockIdx.x * blockDim.x + threadIdx.x;
    y = blockIdx.y * blockDim.y + threadIdx.y;
    odata[y][x] = func(idata[y][x]);
}
...
dim3 gridDef2(10,10,1);
dim3 blockDef2(16,16,1);
kernel2<<<gridDef2, blockDef2>>>(paramList);
Comparing 1D and 2D Examples
| Description | 1D Addressing Example | 2D Addressing Example |
|---|---|---|
| Grid Definition | dim3 gridDef1(100,1,1); |
dim3 gridDef2(10,10,1); |
| Block Definition | dim3 blockDef1(256,1,1); |
dim3 blockDef2(16,16,1); |
| block dimensions | blockDim.x (\(100\)) |
blockDim.x (\(10\)) |
blockDim.y (\(10\)) |
||
| block indices | blockIdx.x (\(0...99\)) |
blockIdx.x (\(0...9\)) |
blockIdx.y (\(0...9\)) |
||
| thread indices | threadIdx.x (\(0...255\)) |
threadIdx.x (\(0...15\)) |
threadIdx.y (\(0...15\)) |
This can also be extended to a third (z-) Dimension, however we are still limited by the maximum number of Threads per Block of 1024 and the Maximum Thread Dimensions we discussed in the previous episode.
Key Points
Using 2D or 3D GridDefs and BlockDefs can make it easier to address multi-dimensional data.
CUDA has a special type
dim3to define multi-dimensional grid and block definitions.
Memory Performance
Overview
Teaching: 15 min
Exercises: 5 minQuestions
How does memory performance impact overall performance when using GPUs?
Objectives
Understand impact of memory transfer between CPU and GPU memory.
Learn about performance differences between consecutive and strided memory access patterns.
Bandwidth Limitations When Copying Between Host and Device
The bandwidth to transfer data between host-memory (CPU-memory) and device-memory (GPU-memory) is about a order of magnitude lower than the memory transfer rate between CPUs and the host-memory. The transfer rate between GPUs and the device-memory is often significantly higher than that for CPUs.

Therefore it is not uncommon that the memory transfer makes up a large fraction of the total runtime of a GPU accelerated calculation. In order to have an overall improvement of performance, the speedup achieved by the GPU over the CPU, must be large enough to offset the required data transfer.
- Memory transfers between host and device should be kept as minimal as possible.
- Using Page-Locked Host memory (also called pinned memory) can help a bit.
- Using asynchronous transfers (overlapping computation and transfer) also helps.
Consecutive memory access patterns
When a CPU or GPU accesses a memory address, the memory controller always fetches a whole block of data, that contains the requested address, which then is kept in a faster cache very close to the processor. Therefore when in the processor wants to access the next element, it is often already available in the cache and the slower memory-access can be avoided.
Therefore it is better for adjacent threads (i.e. those belonging to the same warp) to access locations consecutive memory addresses (or as close as possible).
- Thread
iaccessing global memory array ata[i]is a GOOD access pattern. - Thread
iaccessing global memory array ata[i*nstride]is a BAD access pattern.
Exercise: Memory access patterns
Is this a good memory access pattern?
x = blockIdx.x * blockDim.x + threadIDx.x;
y = blockIdx.y * blockDim.y + threadIDx.y;

b[x*n+y] = a[x*n+y];
Solution
No, this pattern is not efficient. Neighboring threads within a warp will increment
threadIDx.x, therefore variablexincrements by one between threads in the same warp. In this examplexis multiplied byn.
To illustrate this, let’s look at the indices for \(x = 0, 1, 2\):x = 0: a[0*n+y] x = 1: a[1*n+y] x = 2: a[2*n+y]So between each value of x, the index jumps by a factor of
n(nandyare constant among threads in the same warp). If however we use this expression instead:b[x+n*y] = a[x+n*y];memory is accessed in a coalesced way, minimizing cache-misses.
Shared memory
In cases where consecutive memory access is not possible, using shared memory may provide significant speedup.
Each multiprocessor (SM) has a special, so-called called shared memory, that is small (only 64 KB) but fast, that can be used by all cores of the SM and that needs to be managed by the programmer.
Using Shared memory is out of the scope of this workshop, but generally, it can be filled with e.g. a tile of a global memory array, which can then be accessed in a non-consecutive way without performance penalty, as long as the reads and writes from and to global memory remain consecutive.
An often used example for a problem where a naive approach would use either non-consecutive reads or writes is the matrix transpose, where the rows of an input matrix are converted onto columns of an output matrix.
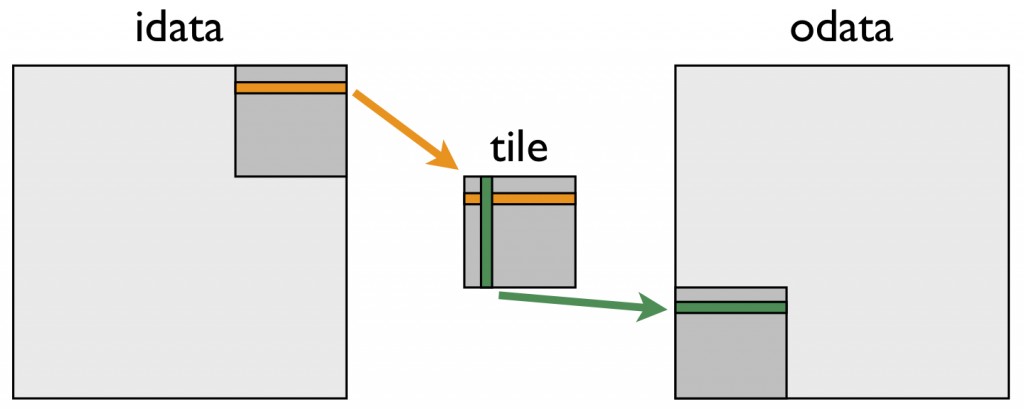
By loading a tile of the matrix into shared memory, both the reads and the writes to global memory can remain consecutive.
The example of the matrix transpose is discussed further on the Nvidia Developer Blog. The CUDA C programming guide explains the use of shared memory by performing a matrix multiplication.
Shared memory bank conflicts
Shared memory is organized into equally sized modules (banks) that can be accessed simultaneously. However if multiple threads want to access memory-addresses that are located in the same bank, these accesses cannot happen at the same time. The following articles discuss how to deal and avoid bank conflicts:
- https://developer.nvidia.com/blog/using-shared-memory-cuda-cc/
- https://developer.nvidia.com/blog/efficient-matrix-transpose-cuda-cc/#shared_memory_bank_conflicts
Key Points
GPU memory has much higher bandwidth than CPU memory, which comes at a cost of higher latency.
Time to copy data between CPU- and GPU memory can be a large fraction of total runtime.
Access of consecutive memory addresses is much faster than strided access.
Using shared memory can help when strided access cannot be avoided, but needs to be managed manually.
Exercise: Julia Set
Overview
Teaching: 5 min
Exercises: 30 minQuestions
Exercise to apply what we have learned so far.
Objectives
Starting from this CPU version of the Julia Set code, port it to using GPUs using CUDA.
In the first session of the ACENET Summer School we have been introduced to the Julia set as an example to demonstrate weak and strong scaling.
At https://acenet-arc.github.io/ACENET_Summer_School_GPGPU/code/10-exercise-julia-set/julia_cpu.cu we have implementation of the Julia set for calculation on CPUs.
The goal of this exercise is to adapt this file for computation on CPUs.
It consists of three parts:
main() function
The main() function allocates the CPU memory, calls the kernel() function and writes a data file julia.dat that contains the x- and y-coordinates of points that should be colored pixels.
int main( void ) {
    int x,y;
    int *arr;
    FILE *out;
    size_t memsize;

    memsize = DIM * DIM * sizeof(int);

    arr=(int *)malloc(memsize);

    kernel(arr);

    out = fopen( "julia.dat", "w" );
    for (y=0; y<DIM; y++){
        for (x=0; x<DIM; x++) {
            int offset = x + y * DIM;
            if(arr[offset]==1)
                fprintf(out,"%d %d \n",x,y);
        }
    }
    fclose(out);

    free(arr);
}
kernel() function
The kernel() function loops over x and y values, calling the julia() function and storing the result in the array arr.
void kernel(int *arr){
    int x,y;

    for (y=0; y<DIM; y++) {
        for (x=0; x<DIM; x++) {
            int offset = x + y * DIM;
            int juliaValue = julia( x, y );
            arr[offset] = juliaValue;
        }
    }
}
julia() function
This function tests whether combination x,y diverges (in which case it returns 0) or not (in which case it returns 1).
int julia(int x, int y){
    const float scaling = 1.5;
    float scaled_x = scaling * (float)(DIM/2 - x)/(DIM/2);
    float scaled_y = scaling * (float)(DIM/2 - y)/(DIM/2);

    float c_real=-0.8f;
    float c_imag=0.156f;

    float z_real=scaled_x;
    float z_imag=scaled_y;
    float z_real_tmp;

    int iter=0;
    for(iter=0; iter<1000; iter++){

        z_real_tmp = z_real;
        z_real =(z_real*z_real-z_imag*z_imag) +c_real;
        z_imag = 2.0f*z_real_tmp*z_imag + c_imag;

        if( (z_real*z_real+z_imag*z_imag) > 1000)
            return 0;
    }

    return 1;
}
Exercise: convert this code to run GPUs
- Convert the function
julia()to be able to be compiled for GPUs. Hint: this requires adding the__device__specifier at the beginning of the function declaration.- Convert the function
kernel()into a CUDA kernel by replacing the loops with statements to calculatexandypositions using 2D-grids and -blocks.
- add an if-clause to ensure that
xandyare within the range ofDIM.- Convert the function
main()to allocate GPU memory, call the GPU-kernel with 2D-grid and -block and copy the result array back to host-memory before saving it to a file.You can either work directly with the file
julia_cpu.cuor downloadjulia_gpu_template.cuas a template for your conversion.Solution for the julia() function
As hinted above, the only change that’s required is adding the
__device__specifier to the declaration of thejulia()function.__device__ int julia(int x, int y){ [...] }Solution for the kernel()
- The nested
for-loops are replaced by statements to calculate the values forxandyfromblockIDx,blockDimandthreadIdxusing 2D-addressing.
Remember the implicit parallelism by which the kernel will be called once for each pixel.- To make sure we don’t write to addresses outside the limits of the array, we include an
ifstatement that checks that bothxandyare within the set limits.__global__ void kernel(int *arr){ // map from blockIdx to pixel position int x = blockIdx.x*blockDim.x + threadIdx.x; int y = blockIdx.y*blockDim.y + threadIdx.y; int offset = x + y * DIM; // now calculate the value at that position if(x < DIM && y<DIM){ int juliaValue = julia( x, y ); arr[offset] = juliaValue; } }Solution for the main() function
Allocate memory for
arr_devon GPUWe allocate GPU memory with
cudaMalloc((void **)&arr_dev, memsize);. Here we also check the return code of thecudaMalloc()function for any errors./* allocate memory for arr_dev on GPU */ error = cudaMalloc((void **)&arr_dev, memsize); if (error){ printf ("Error in cudaMalloc %d\n", error); exit (error); }Call the kernel
We define
blockandgriddefinitions and call the kernel with them. For the grid-size we need to useDIM/blocksize+1because ifDIMis not an exact multiple ofblocksize, the remainder would be lost by the division. But because we have added a range-check to the kernel, we don’t have to worry about the final grid being a bit larger than the remaining pixels.dim3 grid(DIM/blocksize+1,DIM/blocksize+1); dim3 block(blocksize,blocksize); kernel<<<grid,block>>>(arr_dev);Copy results to host
Like we’ve done numerous times before, we use
cudaMemcpy()to copy the results from the device memory (arr_dev) back to host memory (arr). Also here we added a check for errors.// copy results to host error = cudaMemcpy(arr, arr_dev, memsize, cudaMemcpyDeviceToHost); if (error){ printf ("Error in cudaMemcpy %d\n", error); exit (error); };cleanup
We call
cudaDeviceSynchronize();to ensure all CUDA kernels have finished. In this case it is not required ascudaMemcpy()already ensures that the kernels have finished and blocks the CPU-code until the copy has finished. However there are also asynchronous versions of this function.Finally we call
cudaFree(arr_dev);to release GPU memory./* guarantee synchronization */ cudaDeviceSynchronize(); /* free device memory */ cudaFree(arr_dev);The remaining code of the
main()function can stay as is.You can find the full solution at:
https://acenet-arc.github.io/ACENET_Summer_School_GPGPU/code/10-exercise-julia-set/julia_gpu_solution.cu.
Key Points
Where To Go Next?
Overview
Teaching: 5 min
Exercises: 0 minQuestions
What software libraries can I use so that I don’t need to write my own kernels?
Where can I find additional resources?
Objectives
Links to additional resources.
Use of optimized libraries
If the problem that needs to be accelerated, is a known and somewhat known mathematical problem, it is often not necessary to write custom CUDA kernels, because there are a variety of GPU-accelerated libraries. Those usually perform much better than kernels that we could come up with ourselves, because teams of programmers have spent countless hours to optimize them.
| Description | Name | URL |
|---|---|---|
| BLAS (Basic Linear Algebra Subprograms) | cuBLAS | https://docs.nvidia.com/cuda/cublas/ |
| Drop-in BLAS (based on cuBLAS) | NVBLAS | https://docs.nvidia.com/cuda/nvblas/ |
| FFT (Fast Fourier Transform) | cuFFT | https://docs.nvidia.com/cuda/cufft/ |
| Sparse matrices | cuSPARSE | https://docs.nvidia.com/cuda/cusparse/ |
| Solver for dense and sparse matrices | cuSOLVER | https://docs.nvidia.com/cuda/cusolver/ |
| LAPACK (Linear Algebra Package) | MAGMA | https://icl.utk.edu/magma/ |
| matrix, signal, and image processing | ArrayFire | https://arrayfire.org/docs/ |
More GPU accelerated libraries: https://developer.nvidia.com/gpu-accelerated-libraries
Where to go next?
This has been the barest of introductions to CUDA and GPU programming. Don’t forget the CUDA Programming Guide we mentioned earlier:
- https://docs.nvidia.com/cuda/cuda-c-programming-guide/index.html Here are two shorter tutorials, from NVIDIA:
- https://devblogs.nvidia.com/easy-introduction-cuda-c-and-c/
- https://devblogs.nvidia.com/even-easier-introduction-cuda/
As mentioned in episode 1, there are other ways to program GPUs than CUDA. Here are two OpenACC tutorials, including one from the Alliance:
- https://www.openacc.org/get-started (videos)
- https://docs.alliancecan.ca/wiki/OpenACC_Tutorial (text)
If you’re using GPUs, then performance obviously matters to you. A lot. Here’s a great blog post that summarizes the most important performance issues around GPUs. It’s from a perspective of Deep Learning, but the thoughts are quite general:
Key Points
Many software libraries implement highly-optimized solutions for common problems.